
- This is a home-built project. It's still being improved, so your unit and your copy of the app may differ a little from what's described here.
- The controller has only been tested on a Silver Reed SK840. Other models may work differently and could be damaged, so try them at your own risk.
- It may void your machine's warranty. If it's connected or built incorrectly, it could damage the carriage electronics, the controller or your computer.
- It's not an official product. It isn't made, supported or endorsed by any knitting machine maker, and there's no guarantee.
What is TinkrkniT?
TinkrkniT lets you design colorwork on your computer and knit it on your knitting machine, without punch cards or the machine's own console. You still knit by hand, pushing the carriage across the bed as usual. TinkrkniT chooses the needles for every row and tells you when to change yarn.
It's made of two parts that work together:
- TinkrkniT, the design software. It runs in your web browser. You draw your design in it, check that it can be knitted, and then knit from it.
- TinkrkniT Controller, the hardware. It's a small box that sits between your computer and the knitting carriage, with a screen, a button and two lights. It tells the carriage which needles to select.
The design tools aren't tied to any particular machine. Knitting from the app works with Silver Reed and Knitmaster electronic machines, using TinkrkniT Controller. See Compatible machines.
While you knit, your design is sent to the controller one row at a time. Each pass of the carriage knits one row, and the next row is sent as soon as the pass is finished. When the next pass needs a different yarn or carriage setting, both the app and the controller tell you before you start it.
In this guide, the app means TinkrkniT and the controller means TinkrkniT Controller.
What you'll need
| Item | What it's for | Where to get it |
|---|---|---|
| TinkrkniT | Designing your pattern and knitting from it. | Getting the software |
| TinkrkniT Controller | Selecting the needles on the carriage. | Getting the controller |
| A compatible knitting machine | A Silver Reed or Knitmaster machine with an electronic patterning carriage. Only the SK840 has been tested so far. You don't need a machine just to design. | See Compatible machines |
| A computer | Runs TinkrkniT in Chrome or Edge, and needs a free USB port. | Your own computer |
| A USB cable | Connects the controller to the computer and powers it. It must be a data cable, not a charge-only one. | Any electronics shop |
| The carriage cable | Connects the carriage to the controller's round 8-pin socket. | See Getting the controller |
| A 16 V power supply | Powers the needle selector in the carriage. You can leave it disconnected while you try things out. | See Getting the controller |
Compatible machines
To knit from the app, TinkrkniT Controller needs a machine with an electronic patterning carriage. These machines should work, but only the SK840 has been tested so far. Try the others at your own risk (see Before you start).
| Machine | Status |
|---|---|
| Silver Reed SK840 | Tested |
| Silver Reed SK830 | Should work, not tested yet |
| Silver Reed SK860 | Should work, not tested yet |
| Silver Reed SK890 | Should work, not tested yet |
| Knitmaster 550 | Should work, not tested yet |
| Knitmaster 560 | Should work, not tested yet |
| Knitmaster 580 | Should work, not tested yet |
Designing works for any machine, or none. The design tools aren't tied to a machine, so you can use TinkrkniT to chart colorwork for a punch-card machine, another make of electronic machine, or hand knitting. Print the chart or a knitting plan from Exporting files.
Getting the software
TinkrkniT runs in your web browser. There are three ways to run it, all the same app, and any of them can also be installed as an app.
| Way | Who it suits | Where designs are saved |
|---|---|---|
| Use it online | Most people. Nothing to set up. | In your browser |
| Docker | People who already run Docker | Your choice |
| A PHP server | Anyone with web hosting or a home server | Your choice |
To knit from TinkrkniT, use Chrome or Edge (or Firefox 151 or newer). These are the browsers that can talk to a USB device, which the knit screen needs. Any browser can be used for designing; the Knit button shows a dot where knitting isn't available.
Use it online
Open tinkrknit.com/app. That's all you need to design.
Your designs are saved in your browser, not on our server. To keep a copy somewhere else, use the backup rows in the File menu:
- Back up library downloads one file with every project, stamp and yarn.
- Back up to a folder (Chrome and Edge) keeps a backup up to date in a folder you choose. Choose one inside OneDrive, Dropbox or iCloud and the copy is off your computer too.
- Restore from backup adds what's in a backup file to your library.
The online app updates itself the next time it opens with a connection.
Installing it as an app
Installing gives TinkrkniT its own window and a desktop or Start menu shortcut, and lets it open without an internet connection.
- Chrome or Edge: click the install icon at the right of the address bar, or choose File › Install TinkrkniT.
- Safari on a Mac (macOS 14 or later): File › Add to Dock.
Once it's installed in Chrome or Edge, double-clicking a .knitproj file opens it in TinkrkniT.
Safari deletes a site's saved data if you haven't visited it for about a week. Add TinkrkniT to the Dock and keep a backup.
Run it with Docker
You'll be able to run your own copy of TinkrkniT with Docker, on your computer or a home server, and keep your designs there. The setup steps will be added here once the source is published (see Source code and files).
Host it on a PHP server
You'll need PHP 8.1 or newer, and pdo_sqlite if you want server storage.
- Download the release zip, or
git clonethe repository. - Point the web server's document root at
public/.src/,schema.sqlanddata/stay beside it, outside the web root. - Choose where designs are saved: copy
config.example.phptoconfig.phpand setstorage:'browser'(the default): each visitor's designs stay in their own browser. Use this for anything public.'server': one library indata/knit.sqlite, shared by everyone who can reach the server. Makedata/writable by the web server.
To try it on your own computer, run php -S 127.0.0.1:8080 -t public and open http://127.0.0.1:8080. To update, replace the files; config.php and data/ are left alone.
Anyone who can open the page can see, change and delete every design on it. Keep a 'server' copy on your own network, or behind a password your web server asks for.
Opening it from another computer
Knitting and installing as an app both need the page to come from https://, localhost or 127.0.0.1. A copy opened by its network address, such as http://192.168.1.20:8080, still lets you design but can't knit or be installed. To use it from another computer, put it behind HTTPS, or open it on the computer plugged into the machine.
Getting the controller
How TinkrkniT Controller will be made available, what comes with it (such as the carriage cable and power supply), and how to update its firmware hasn't been decided yet. This section will explain all of that once it has.
You don't need to know how the controller is built to use it. If you'd like to build your own, or repair or modify one, see Controller Hardware.
Source code and files
Links to the TinkrkniT source code, the controller firmware and the hardware files will be added here once they're published.
How this guide is organised
| Part | What's in it |
|---|---|
| TinkrkniT · Designing | Drawing your pattern: the tools, colors, techniques, previews and saving. |
| TinkrkniT · Knitting | Knitting from the app: connecting, setting the needle markers, and following each pass. Starts with a walk-through of a whole piece. |
| TinkrkniT Controller · Usage | Plugging in the controller and reading its screen, lights and button. Everything you need to use it. |
| Help | What to try when something looks wrong. |
| Controller Hardware For tinkerers | Technical documentation for building, repairing or modifying the controller: wiring, the power circuit, safeguards, the USB protocol and specifications. You don't need it to use the controller. |
New to TinkrkniT? Read Setting up the controller, then follow Your first piece.
TinkrkniT · Designing
A tour of the designer
This is what you see when you open the app. The big grid in the middle is your repeat tile: one copy of the motif, one square per stitch. The darker copies around it are "ghost repeats" showing how it continues across the panel.
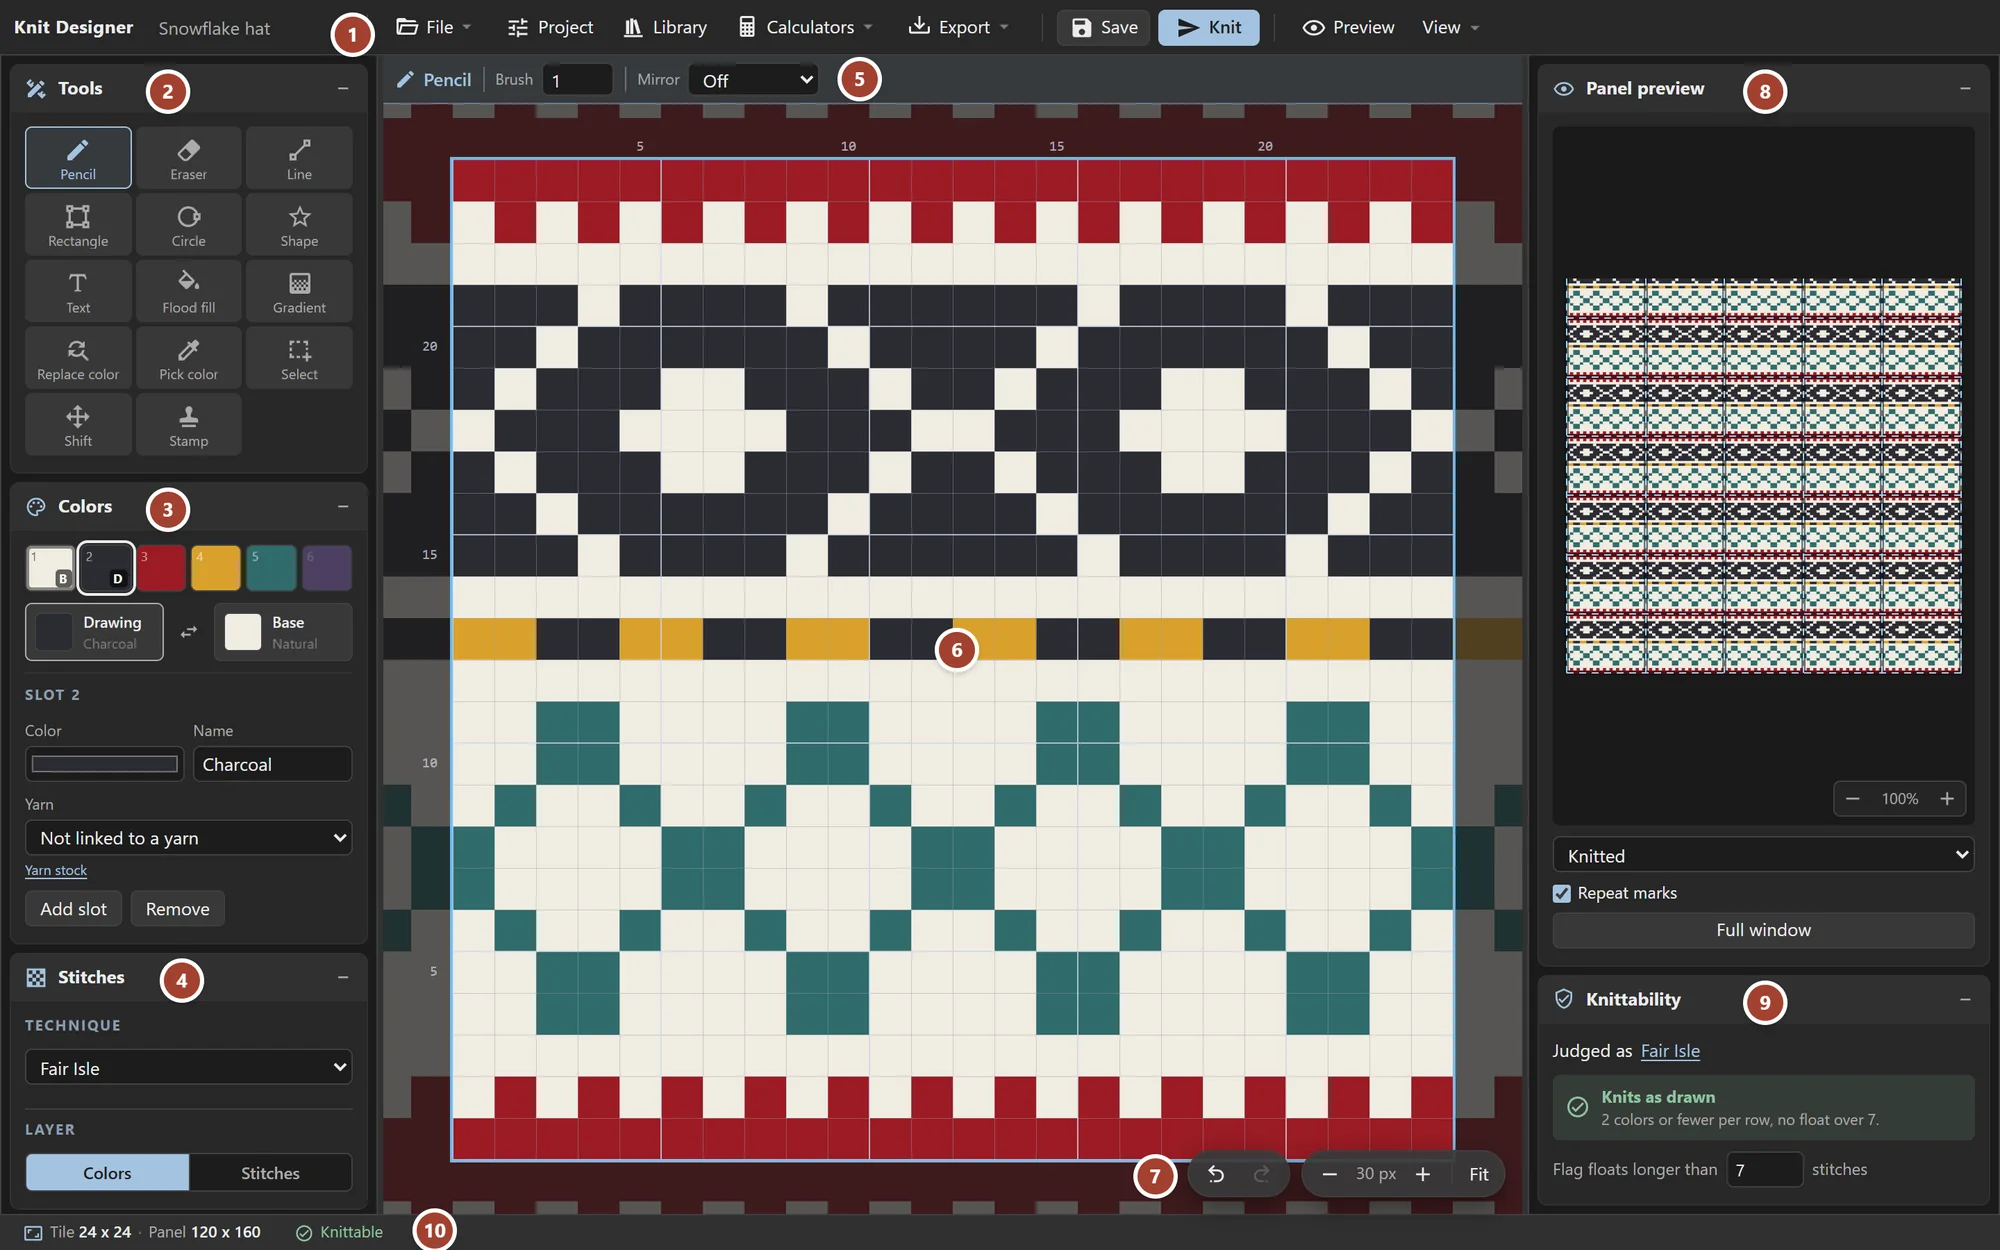
- ToolbarFile, Project, Library, Calculators and Export on the left; Save and Knit in the middle; Preview and View on the right. The project's name sits beside the logo and you can click it to rename the project.
- ToolsThe drawing tools. See Drawing tools.
- ColorsYour palette, and which color each mouse button paints. See Colors and yarns.
- StitchesThe knitting technique, and which layer you're drawing on. See Techniques.
- Options barSettings for the tool you're holding, such as brush size or mirror drawing. See The options bar.
- The gridYour repeat tile. Row numbers run up the left side from the cast-on edge, and stitch numbers run along the top.
- View controlsUndo and redo, zoom in and out, and Fit to fit the tile in the window.
- Panel previewThe whole panel as knitted fabric. See Previewing the fabric.
- KnittabilityWhether the machine can knit what you've drawn. See Knittability.
- Status barThe tile and panel size (click to change them), the knittability badge, and the stitch and row under the mouse.
Tile and panel
Two sizes matter in every project:
- The panel is the whole piece of knitting, for example 120 stitches by 160 rows for a hat.
- The repeat tile is the motif you draw, for example 24 × 24. The app repeats it across and up to fill the panel.
The status bar always shows both, for example Tile 24 x 24 · Panel 120 x 160. Click it to change them in Project settings.

Moving around the grid
- Zoom with the mouse wheel or the − and + buttons. Fit (or 0) fits the tile to the window.
- Pan by holding Space and dragging.
- Undo and redo with the arrow buttons, Ctrl+Z and Ctrl+Shift+Z (or Ctrl+Y).

Drawing tools
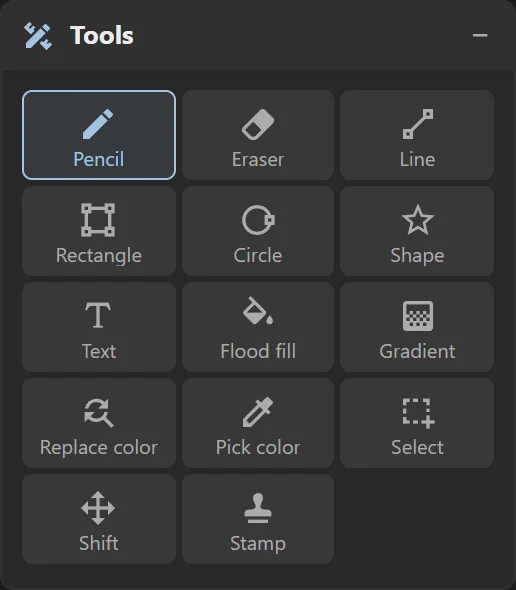
Click a tool, or press its letter on the keyboard. Hover over a tool to see a reminder of what it does.
Most tools paint with the drawing color on the left mouse button and the base color on the right. You choose both in the Colors panel.
| Tool | Key | What it does |
|---|---|---|
| Pencil | B | Draw single stitches. Right-drag paints the base color. |
| Eraser | E | Paint back to the background color (slot 1). |
| Line | L | Drag for a straight line. Thickness follows the brush size. |
| Rectangle | R | Drag a box. Hold Shift for a square. |
| Circle | C | Drag an oval. Hold Shift for a circle. |
| Shape | G | Drag to place a ready-made shape (heart, star, diamond, snowflake and more). Hold Shift to keep it square. |
| Text | T | Type in the options bar, then click the grid. Drag before letting go to move it. |
| Flood fill | F | Fill a connected area of one color. |
| Gradient | D | Drag from start to end to blend from the drawing color to the base color. Because each stitch is one yarn or the other, the blend is made of dots (dithered). Fills the selection if there is one, otherwise the tile. Shift snaps to 45°. |
| Replace color | X | Swap every stitch of the clicked color for the drawing color. |
| Pick color | I | Set the drawing color from a stitch on the grid. |
| Select | M | Drag a box to select stitches. See Selections. |
| Shift | H | Drag to slide the whole tile. What goes off one edge comes back on the other. |
| Stamp | S | Place a saved motif. See Stamps. |
The options bar
The strip above the grid holds the settings for whichever tool you're using. It changes as you switch tools. You can hide it from the View menu if you want more room.





Selections, copy and paste
With the Select tool (M), drag a box over the grid. The options bar then shows everything you can do with it:
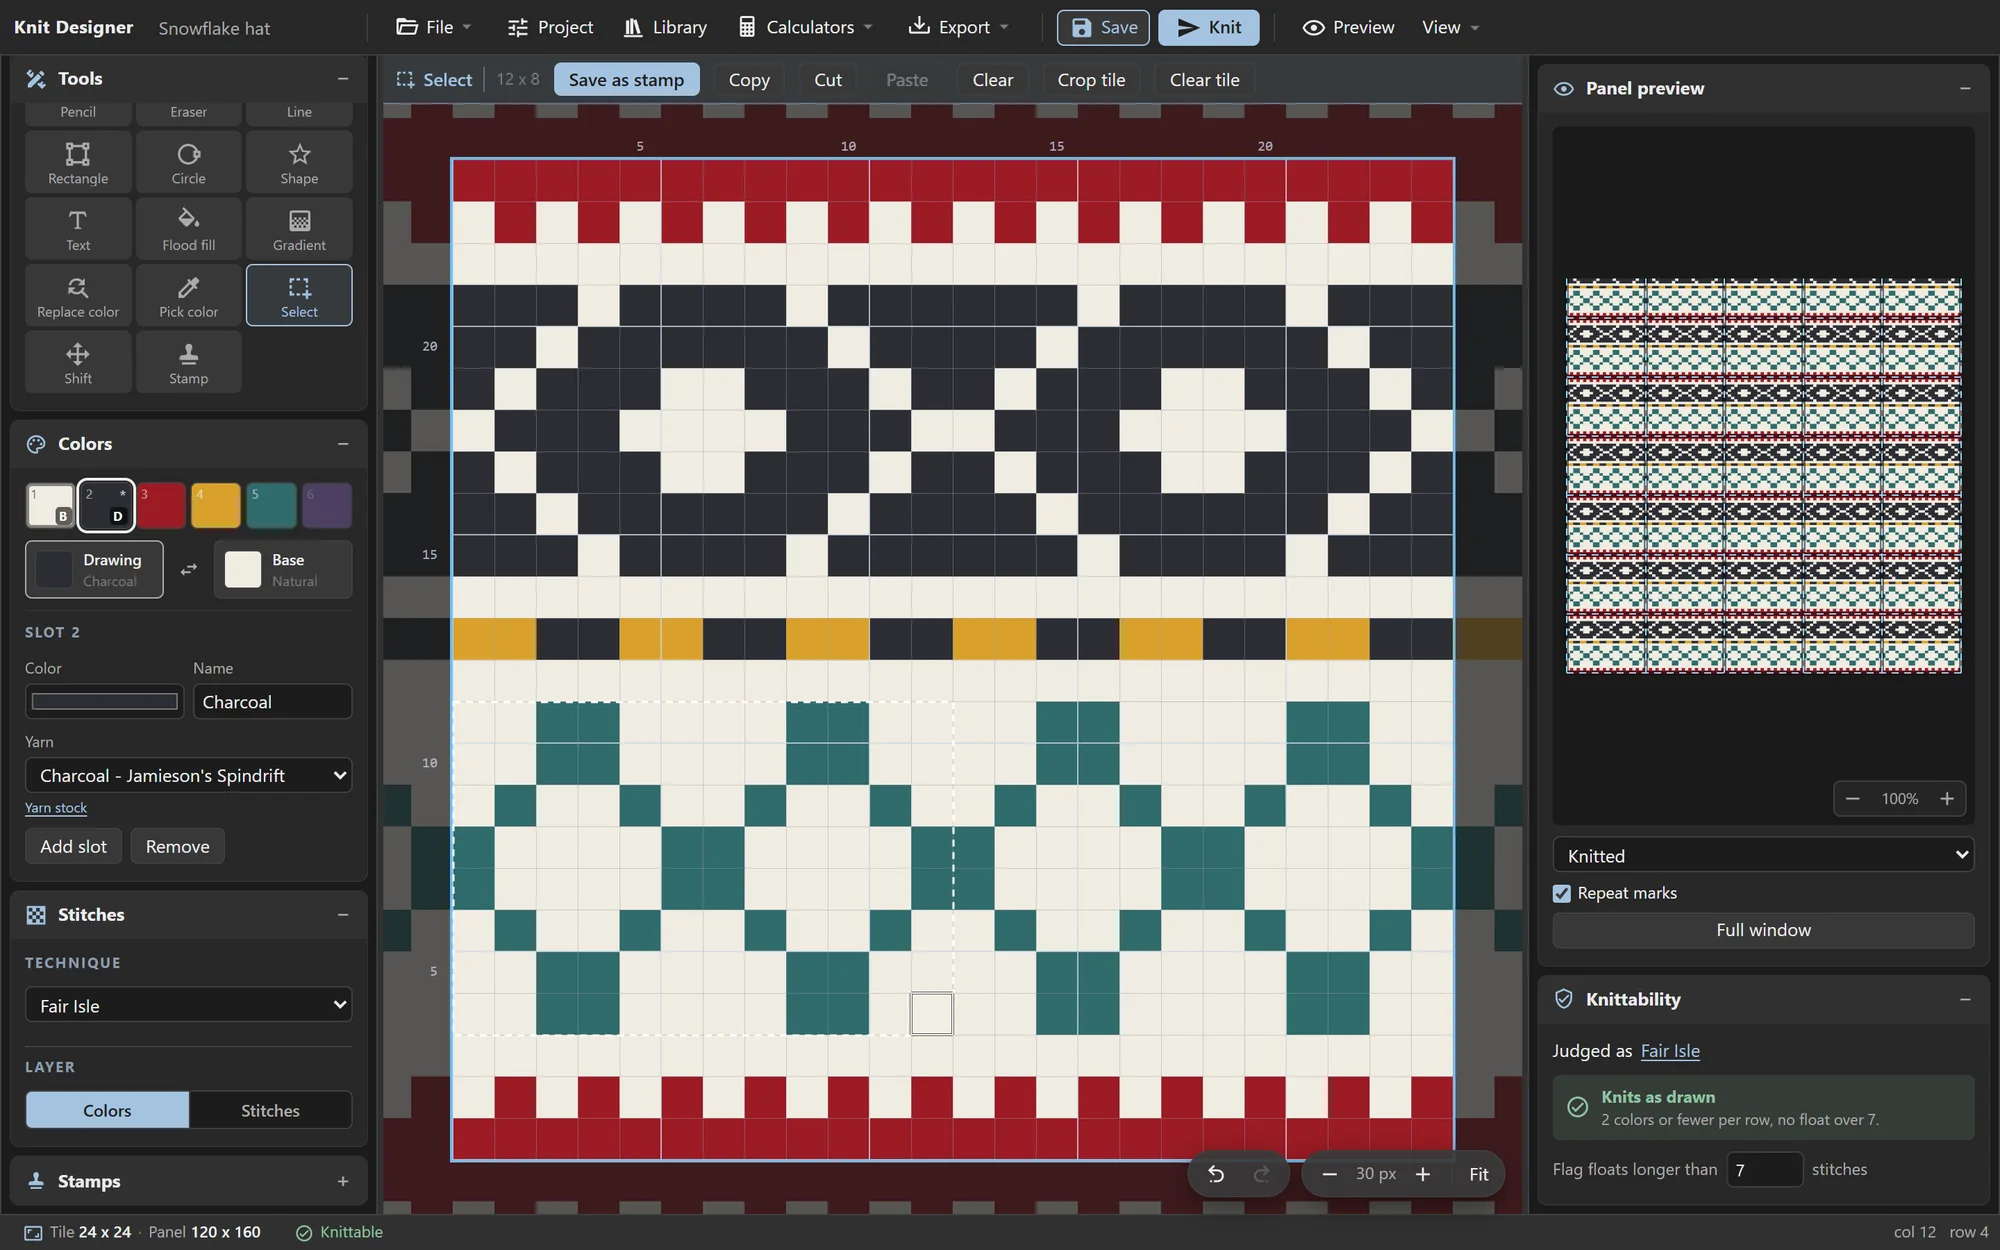

| Button | Key | What it does |
|---|---|---|
| Save as stamp | Saves the selection to your library so you can place it in any project. | |
| Copy / Cut | Ctrl+C / Ctrl+X | Copies the selection. Cut also clears it. |
| Paste | Ctrl+V | Picks the copy up like a stamp: move it, turn it with R, and click to put it down. Arrow keys nudge what you just placed. |
| Clear | Delete | Paints the selection with the background color. |
| Crop tile | Makes the selection the new repeat tile. | |
| Clear tile | Empties the whole tile. |
Press Esc to drop the selection. The copy only lasts while the app is open: it isn't shared with other programs.
Colors and yarns
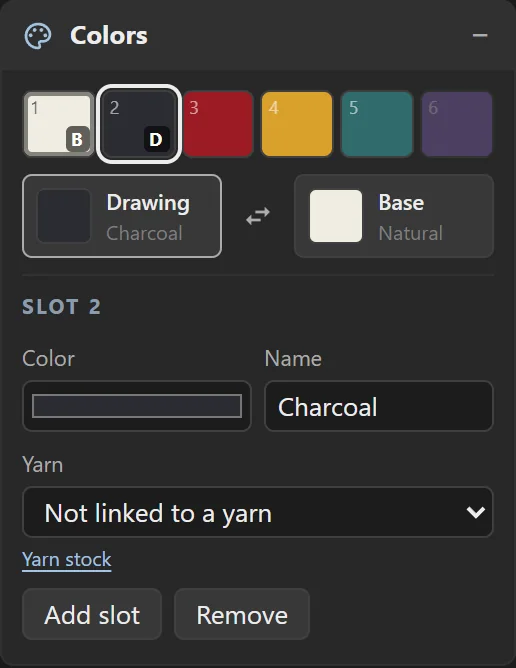
Each project has its own palette of numbered slots. The design stores slot numbers, not colors, so changing a slot's color repaints every stitch that uses it.
- Click a swatch to make it the drawing color (marked D, left mouse button).
- Right-click a swatch to make it the base color (marked B, right mouse button).
- The arrows between them swap the two.
- Number keys 1–9 pick a slot.
Underneath, you can edit the selected slot: its Color, its Name, and which Yarn from your stock it stands for. Linking a yarn uses that yarn's color and name, and lets the yarn estimate work out how much of it you need. Add slot and Remove change the palette size (it always keeps at least two slots).
Slot 1 is the background: the eraser paints with it, and a new tile is filled with it.
A design can have many colors, but each row is limited. Fair Isle knits exactly two colors in any one row, though the pair can change from row to row. The Knittability panel keeps track of this for you.
Slot colors are for the screen. On the knit screen each color is given a yarn letter (A, B, C…) and you can match those to the cones you actually have. See Yarns and changes.
Techniques
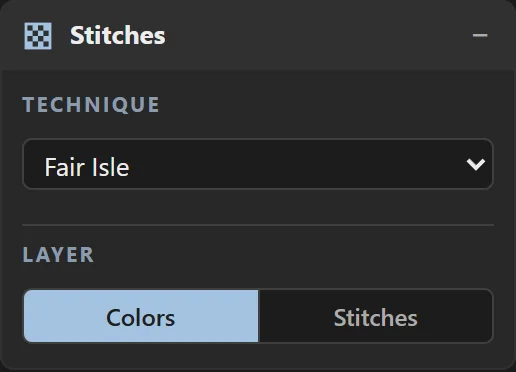
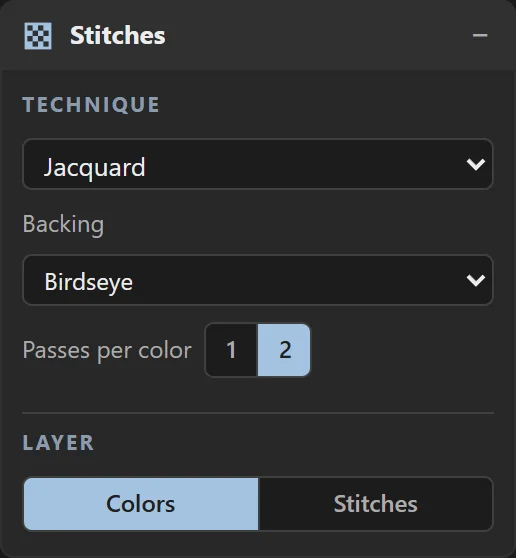
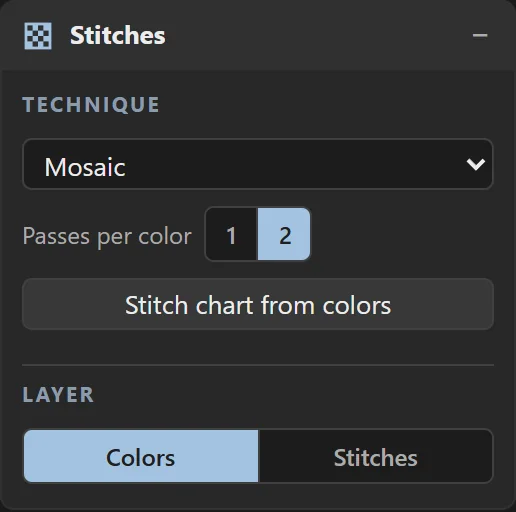
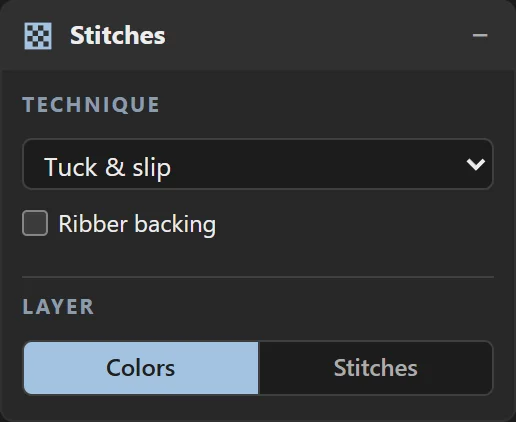
The Stitches panel sets how the design will be knitted. The same drawing can be knitted several ways, so the technique is a setting, not part of the drawing. It's also on the Details tab of Project settings and at the top of the Knittability panel.
| Technique | How it knits | Extra settings |
|---|---|---|
| Fair Isle | Two yarns per row, one in each feeder. The unused yarn floats across the back. The pair can change from row to row. | The float limit, in the Knittability panel. |
| Jacquard | Several colors per row, knitted with the ribber so there are no floats. | Backing: Birdseye, Striped or Ladder. This changes the back of the fabric, not the front. |
| Slip stitch | One color per pass. Needles of the other colors slip, so each row takes a pass for every color in it. | Passes per color: 1 or 2. |
| Mosaic | One yarn per row, with stitches of the other color slipped up from the row below. | Passes per color: 1 or 2. |
| Tuck & slip | Single-color texture, knitted from the stitch layer (below). | Ribber backing: the ribber knits every needle. |
Stitch chart from colors
Slip stitch and Mosaic offer Stitch chart from colors. It writes out the passes the machine will make as an editable tuck & slip chart, one chart row per pass, so you can fine-tune individual passes. Back to colors brings back your original drawing.
With these techniques one drawn row takes several passes, so the rulers, status bar and knit screen count drawn rows and show the pass beside them, for example row 40, pass 3 of 4.
The stitch layer
Besides colors, a project has a second grid of stitches: knit, tuck or slip. Layer in the Stitches panel (or Q) switches which one you draw on. Every tool works on either layer. On the stitch layer, the number keys pick knit, tuck or slip, and the right mouse button paints knit.
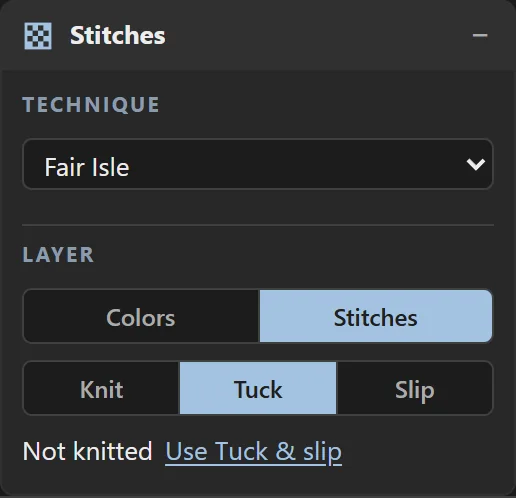
The stitch layer is only knitted with the Tuck & slip technique. If you draw on it with another technique, the panel says Not knitted and offers a link to switch to Tuck & slip.
A single row can tuck or slip, but not both: the carriage is set for one or the other on each pass.
Stamps
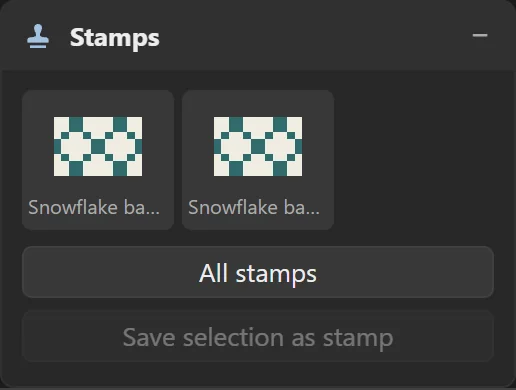
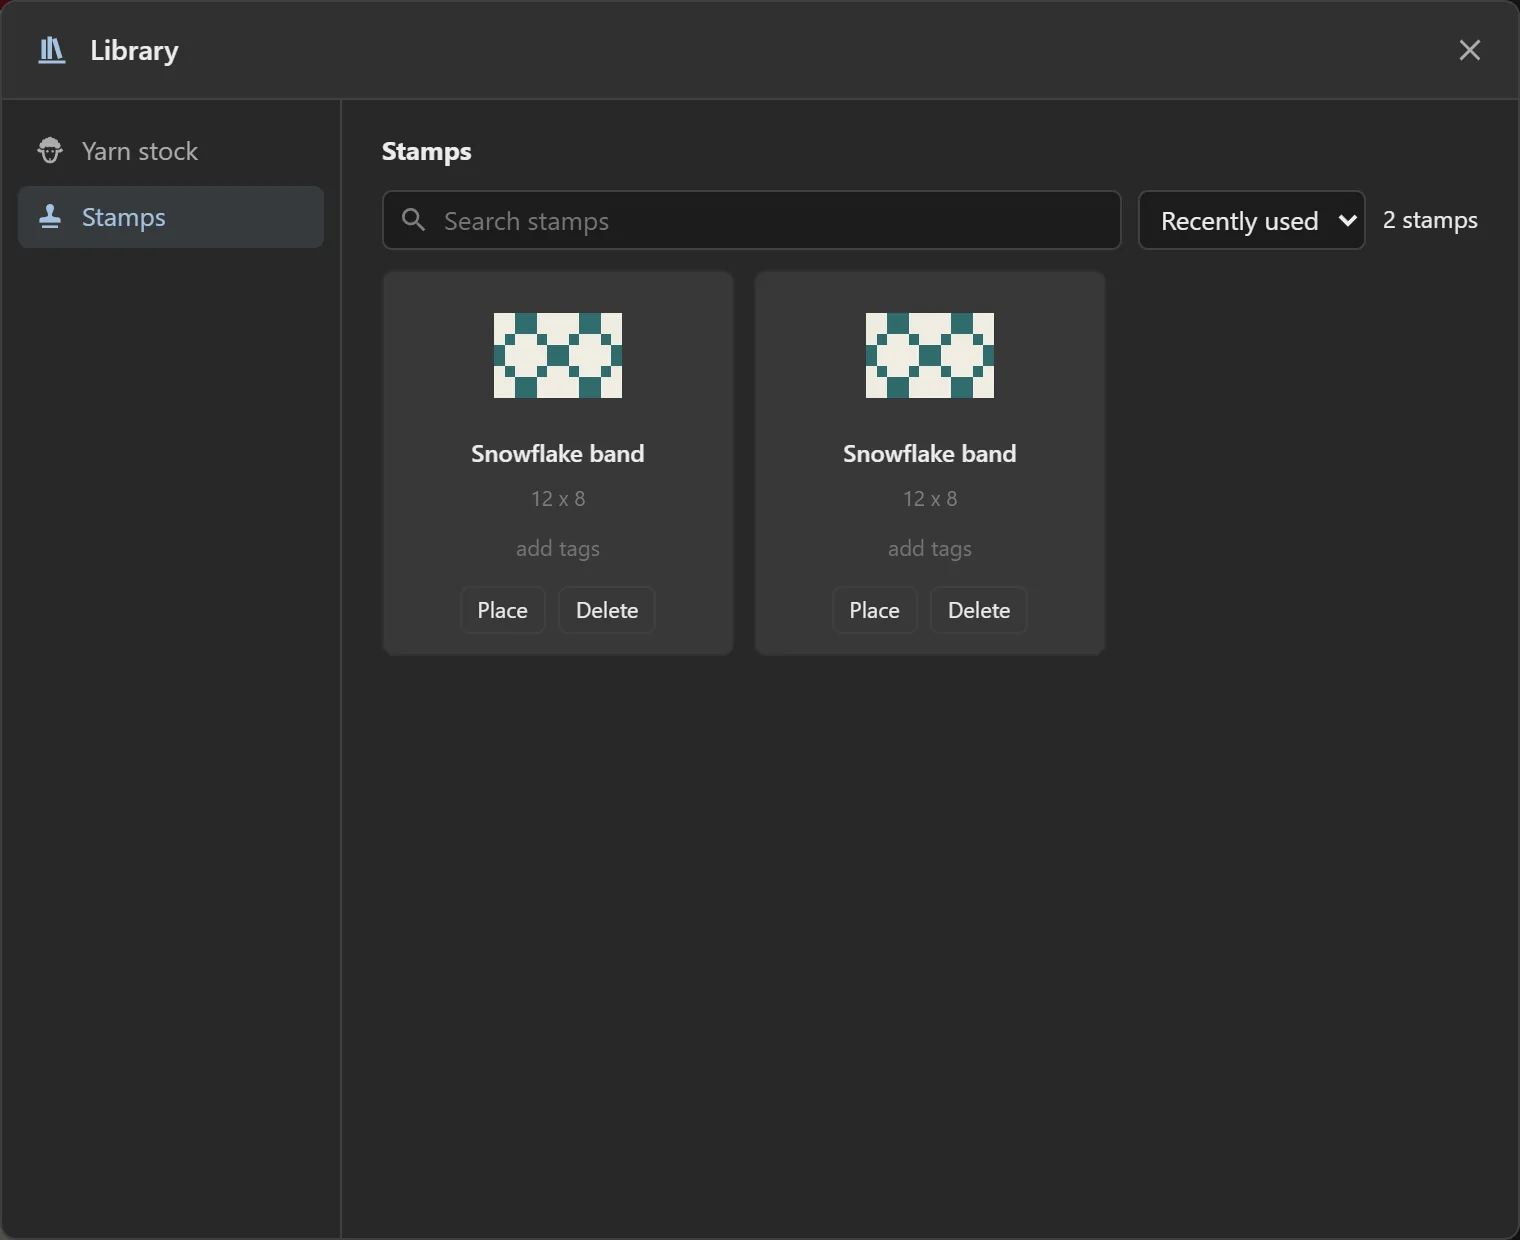
A stamp is a saved motif you can place again and again, in any project. The Stamps panel (closed when you first open the app; click its title to open it) shows your recent stamps. Click one to pick it up, then click the grid to place it.
All stamps opens the full list in the Library. Save selection as stamp saves whatever you've selected.
While you're holding a stamp, R turns it a quarter turn (Shift+R turns it back), and the arrow keys nudge the one you just placed. Stamps remember their colors, so when you drop one into a project with a different palette, each color is matched to the nearest slot.
Previewing the fabric
The Panel preview shows the whole panel with the repeats filled in. Choose how it's drawn from the list under it:
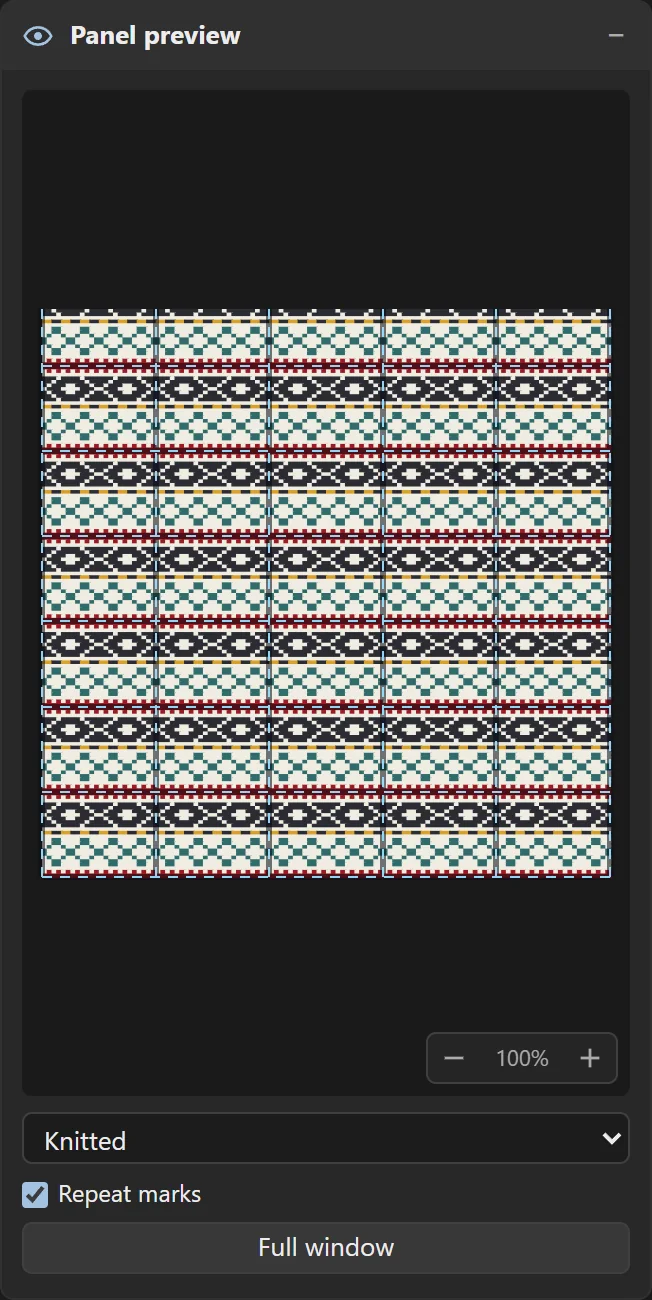
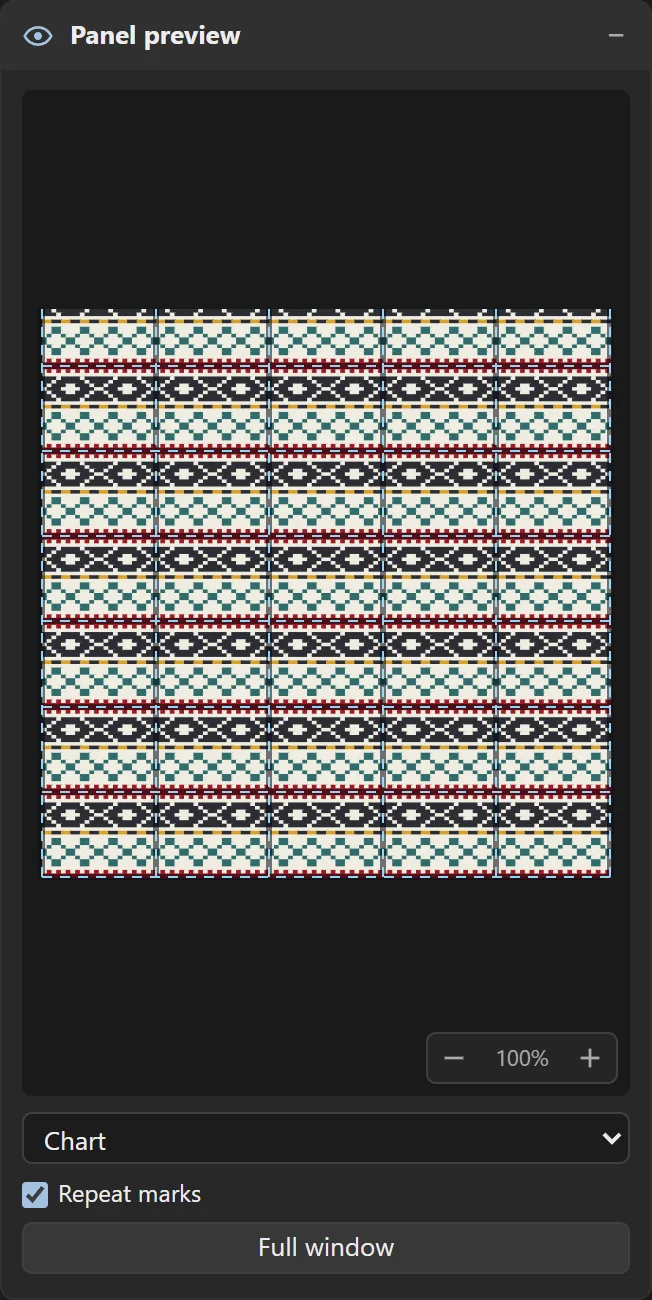
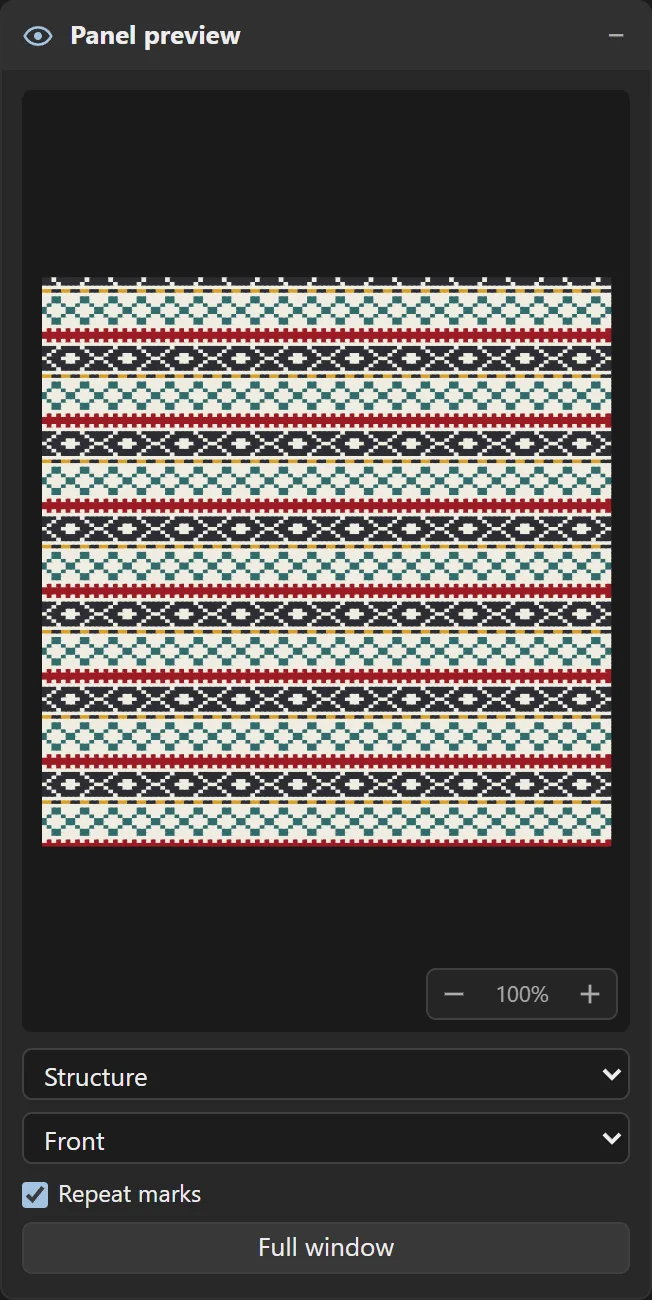
- Scroll to zoom and drag to move around. −, + and the percentage in the corner zoom too (the percentage fits it again).
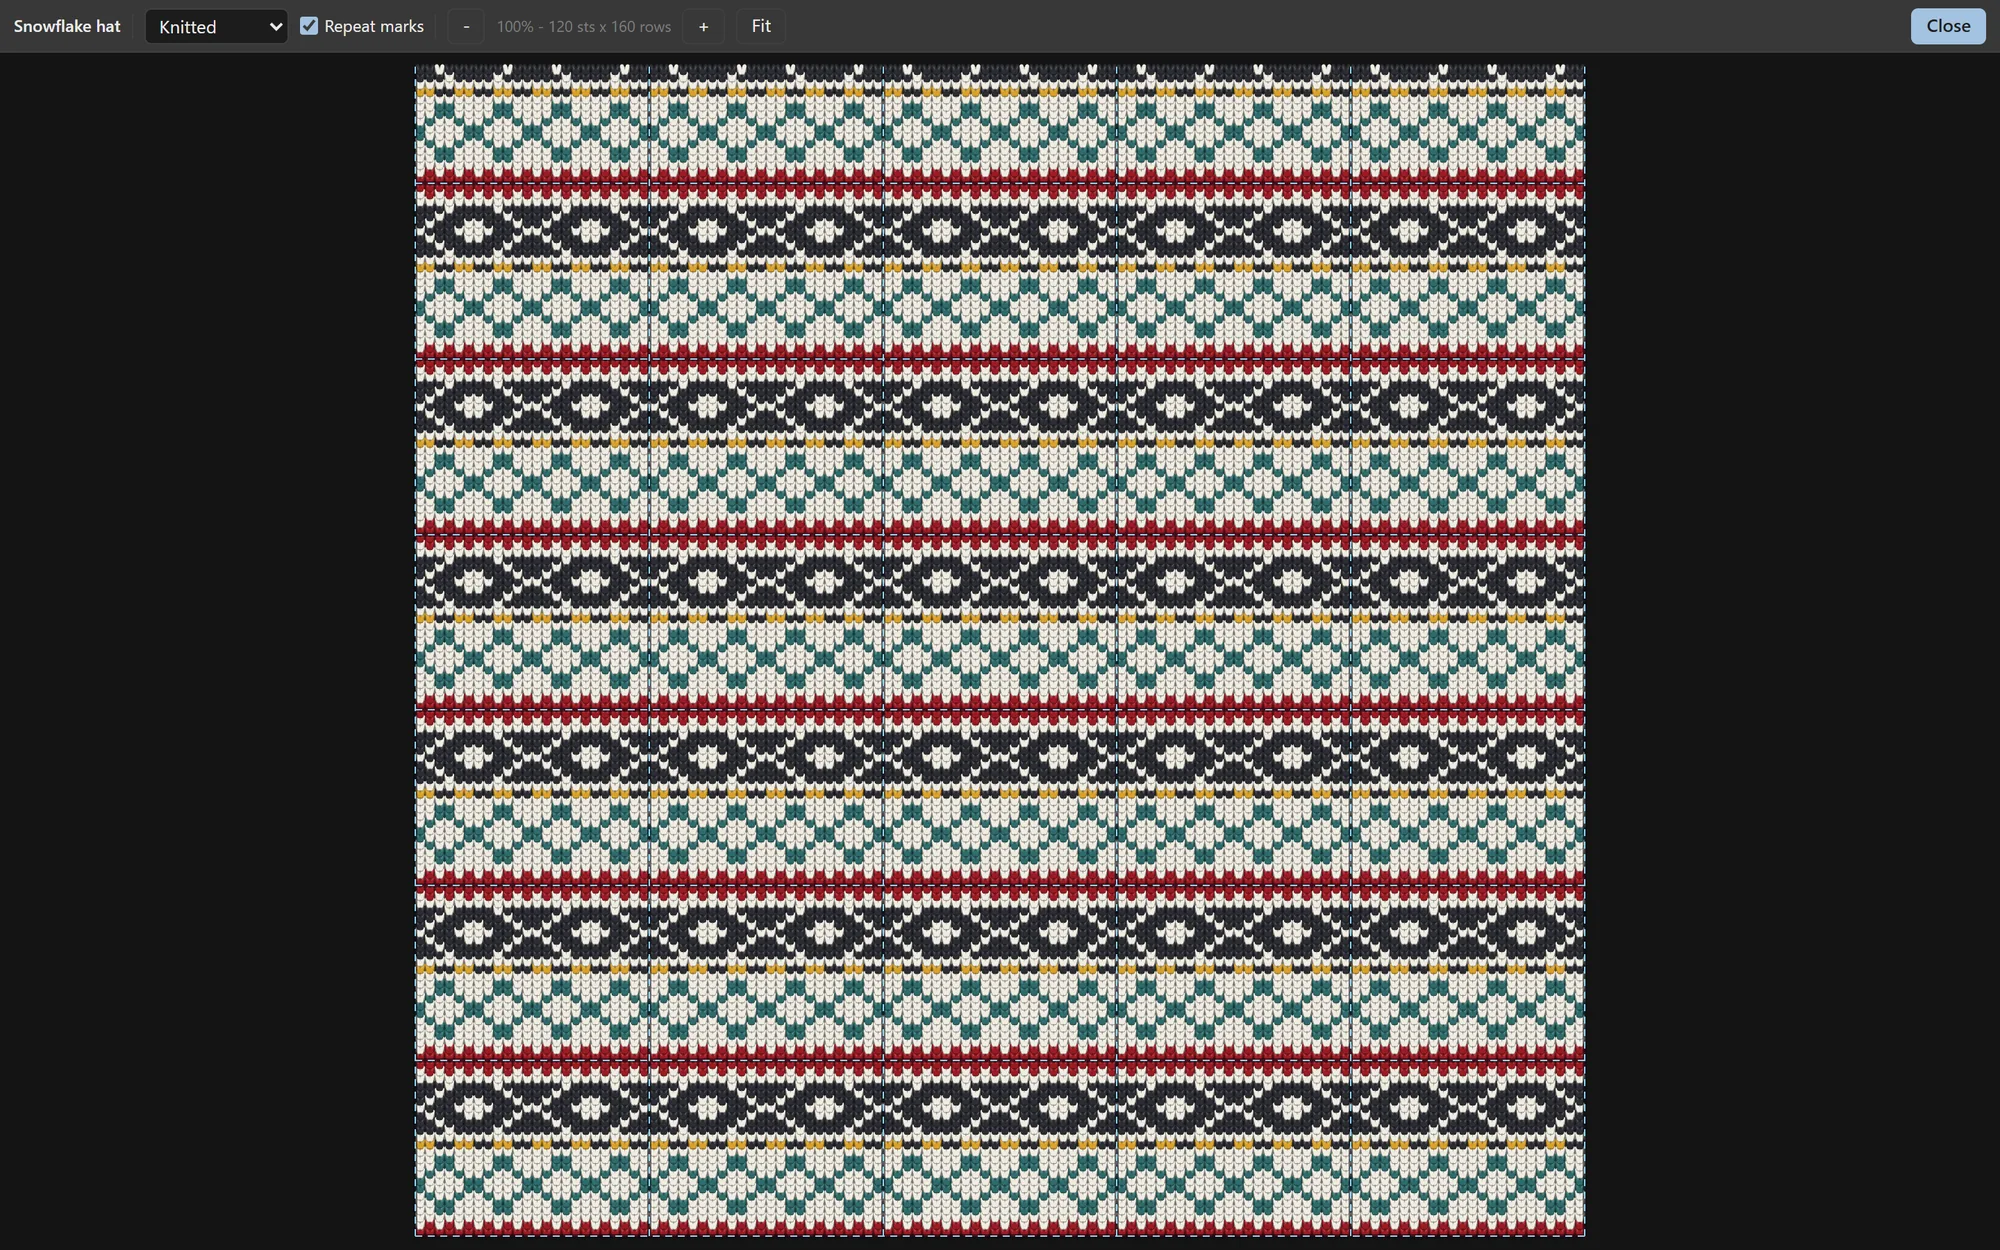
- Repeat marks outlines each copy of the tile.
- Full window (or P, or the toolbar's Preview button, or a click on the preview) fills the window with it. Press Esc or Close to come back.
Knittability
The Knittability panel checks your design against the rules of the technique you've chosen, as you draw. It never stops you drawing: it just tells you what won't work.
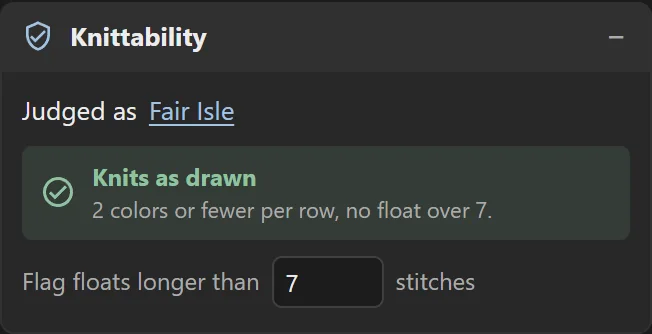
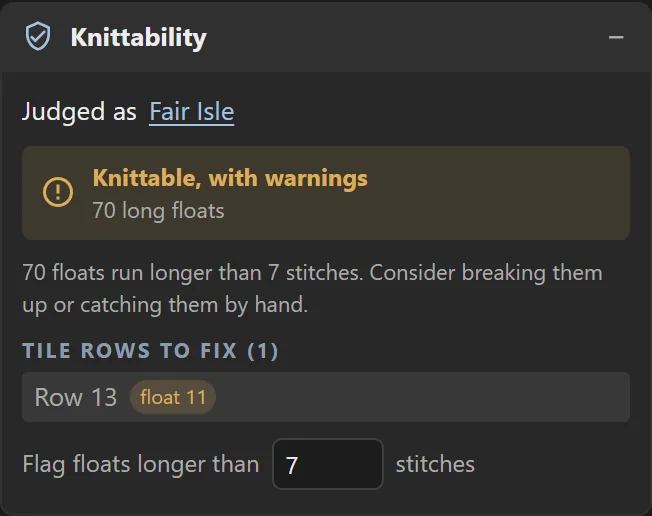
- Judged as shows the technique. Click it to change technique.
- Floats are the strands of unused yarn carried across the back in Fair Isle. Long ones snag. Flag floats longer than sets the limit (7 stitches to start with). Break up long runs with a small dot of the other color, or catch them by hand while knitting.
- Jacquard checks the number of colors per row instead (up to 4 to start with), and has no float check.
- Slip stitch, mosaic and tuck & slip check how many times in a row a needle can tuck or slip, empty passes, and rows that mix tuck and slip.
The badge in the status bar shows the same verdict. Click it to bring the panel into view.

Size, repeats and gauge
Project in the toolbar (or a click on the size in the status bar) opens Project settings. These belong to this project only.
Size
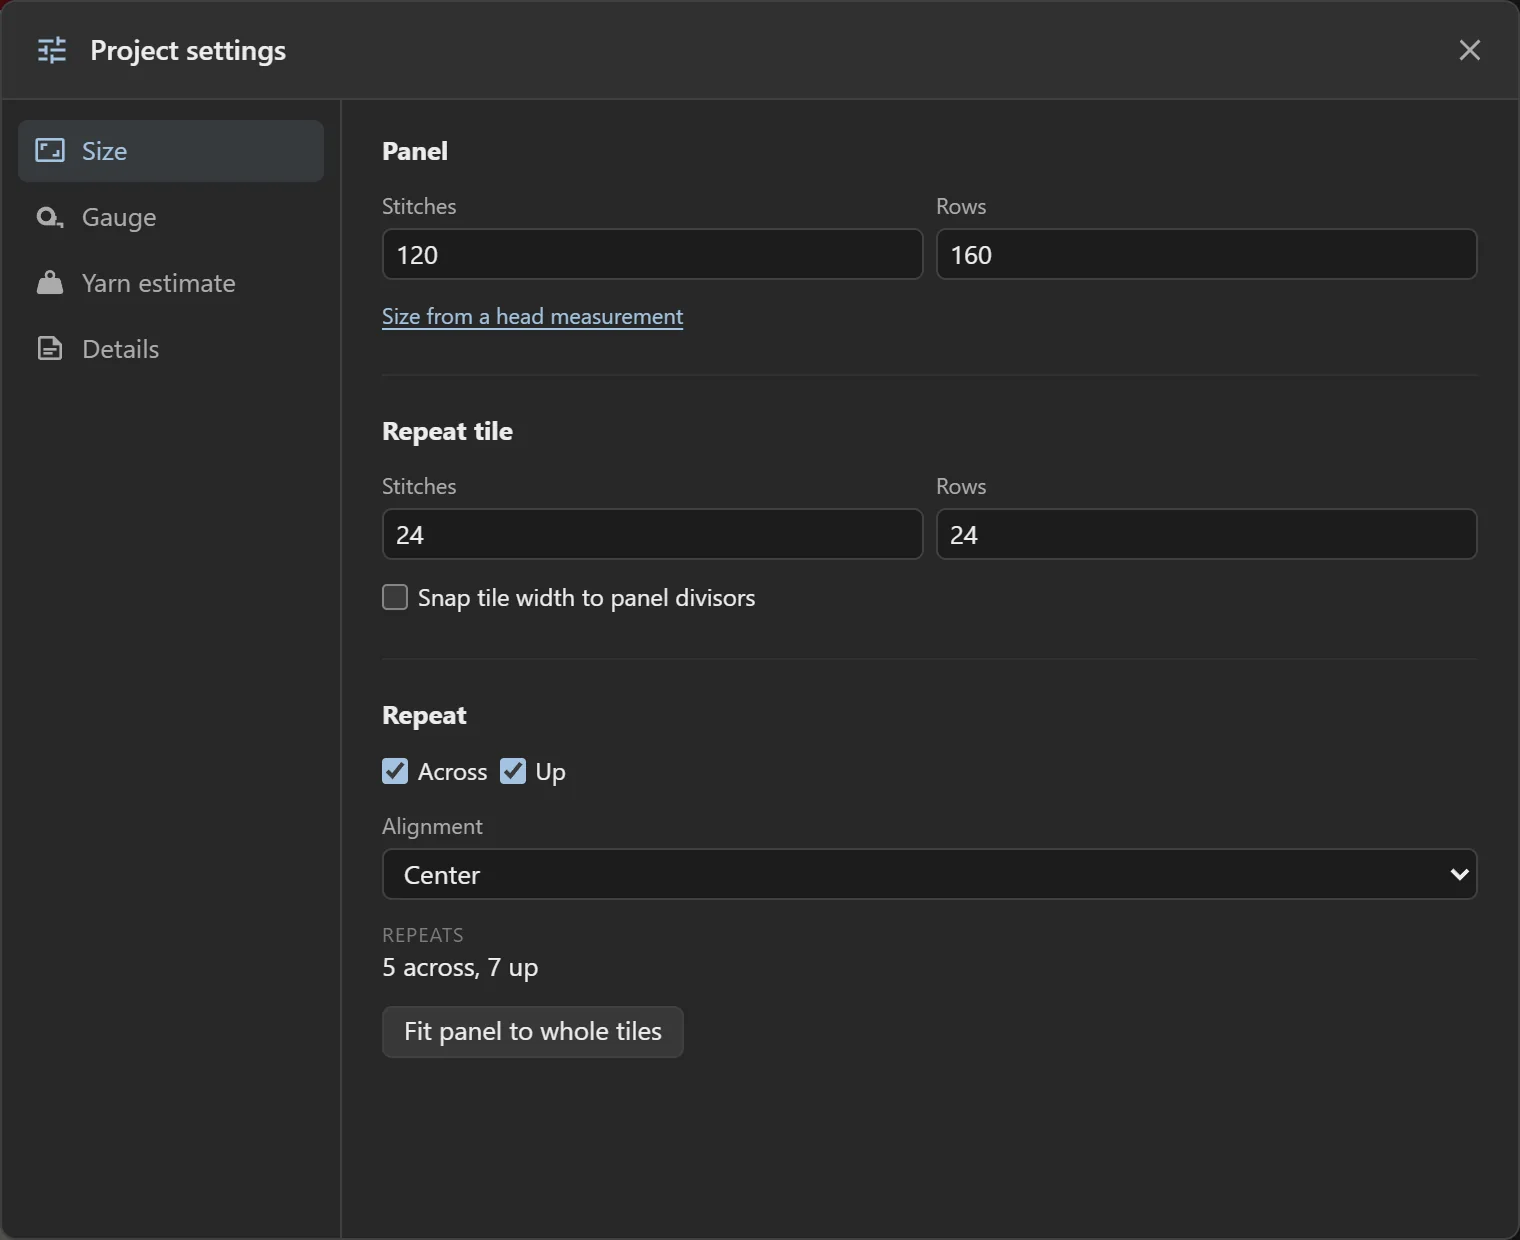
- Panel: the whole piece, in stitches and rows. Size from a head measurement opens the hat calculator.
- Repeat tile: the motif you draw. Snap tile width to panel divisors only allows widths that fit the panel a whole number of times.
- Repeat: repeat the tile across, up, or both, and how it's lined up (for example centered). The number of repeats is shown underneath.
- Fit panel to whole tiles rounds the panel to a whole number of repeats.
Gauge
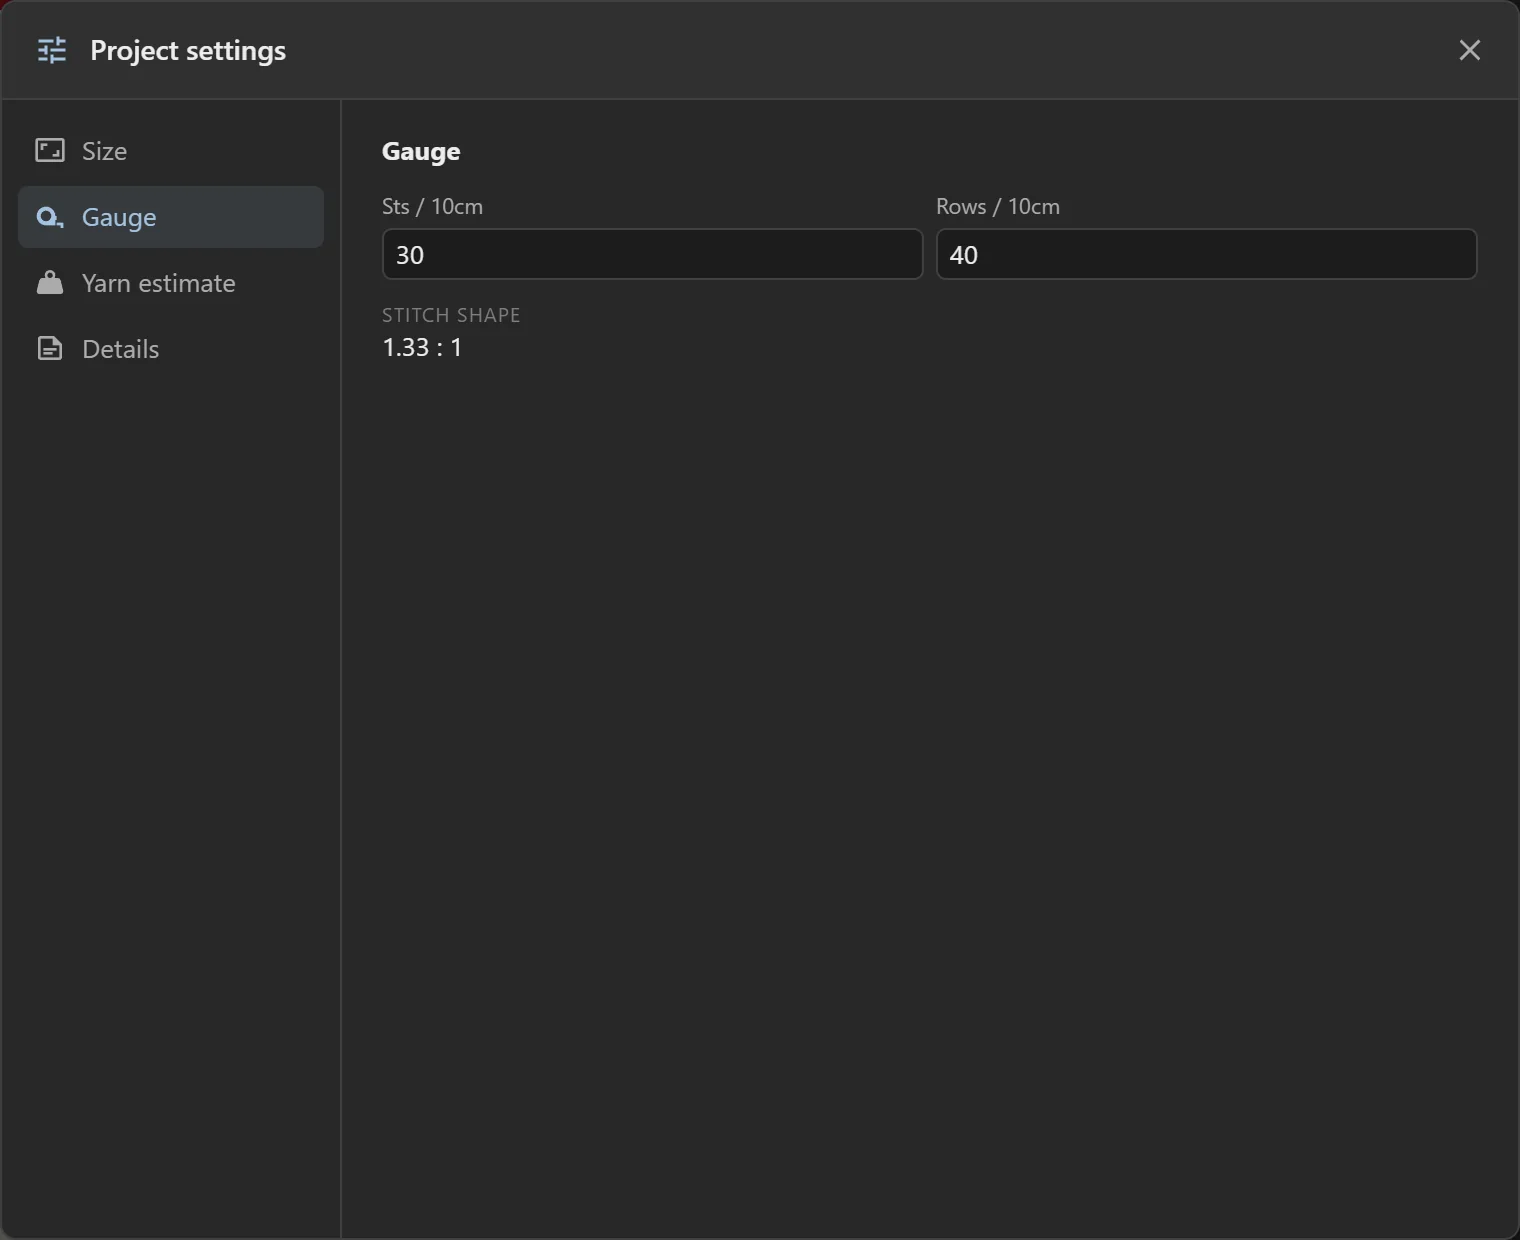
Enter the stitches and rows per 10 cm from a swatch. The app uses them to give sizes in centimeters, to draw stitches the right shape (Stitch shape), for the hat calculator, and for the text tool's Fit gauge.
Drawn rows / 10cm is for slip stitch and mosaic, where one drawn row takes several passes. If you leave it empty the app estimates it.
Yarn estimate and details
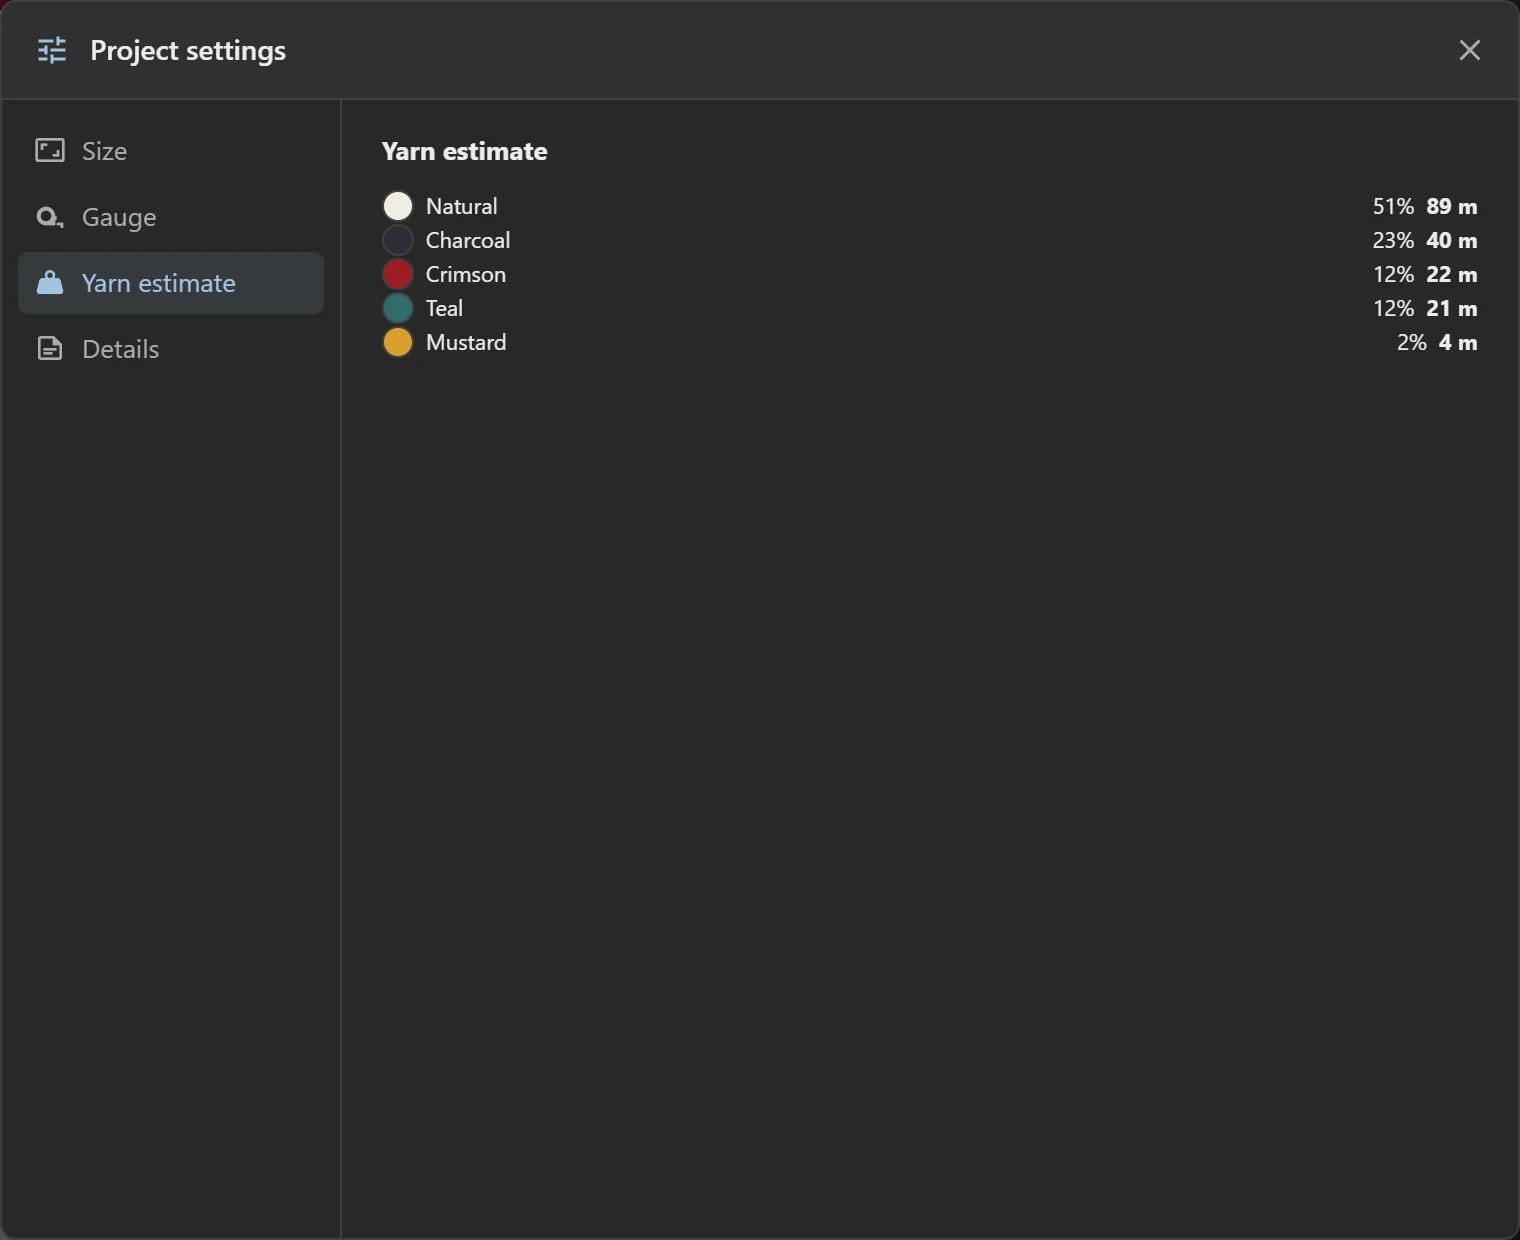
Yarn estimate shows roughly how much of each color the panel uses.
Details holds the project's name, technique (and jacquard backing), and free-form notes.
The library
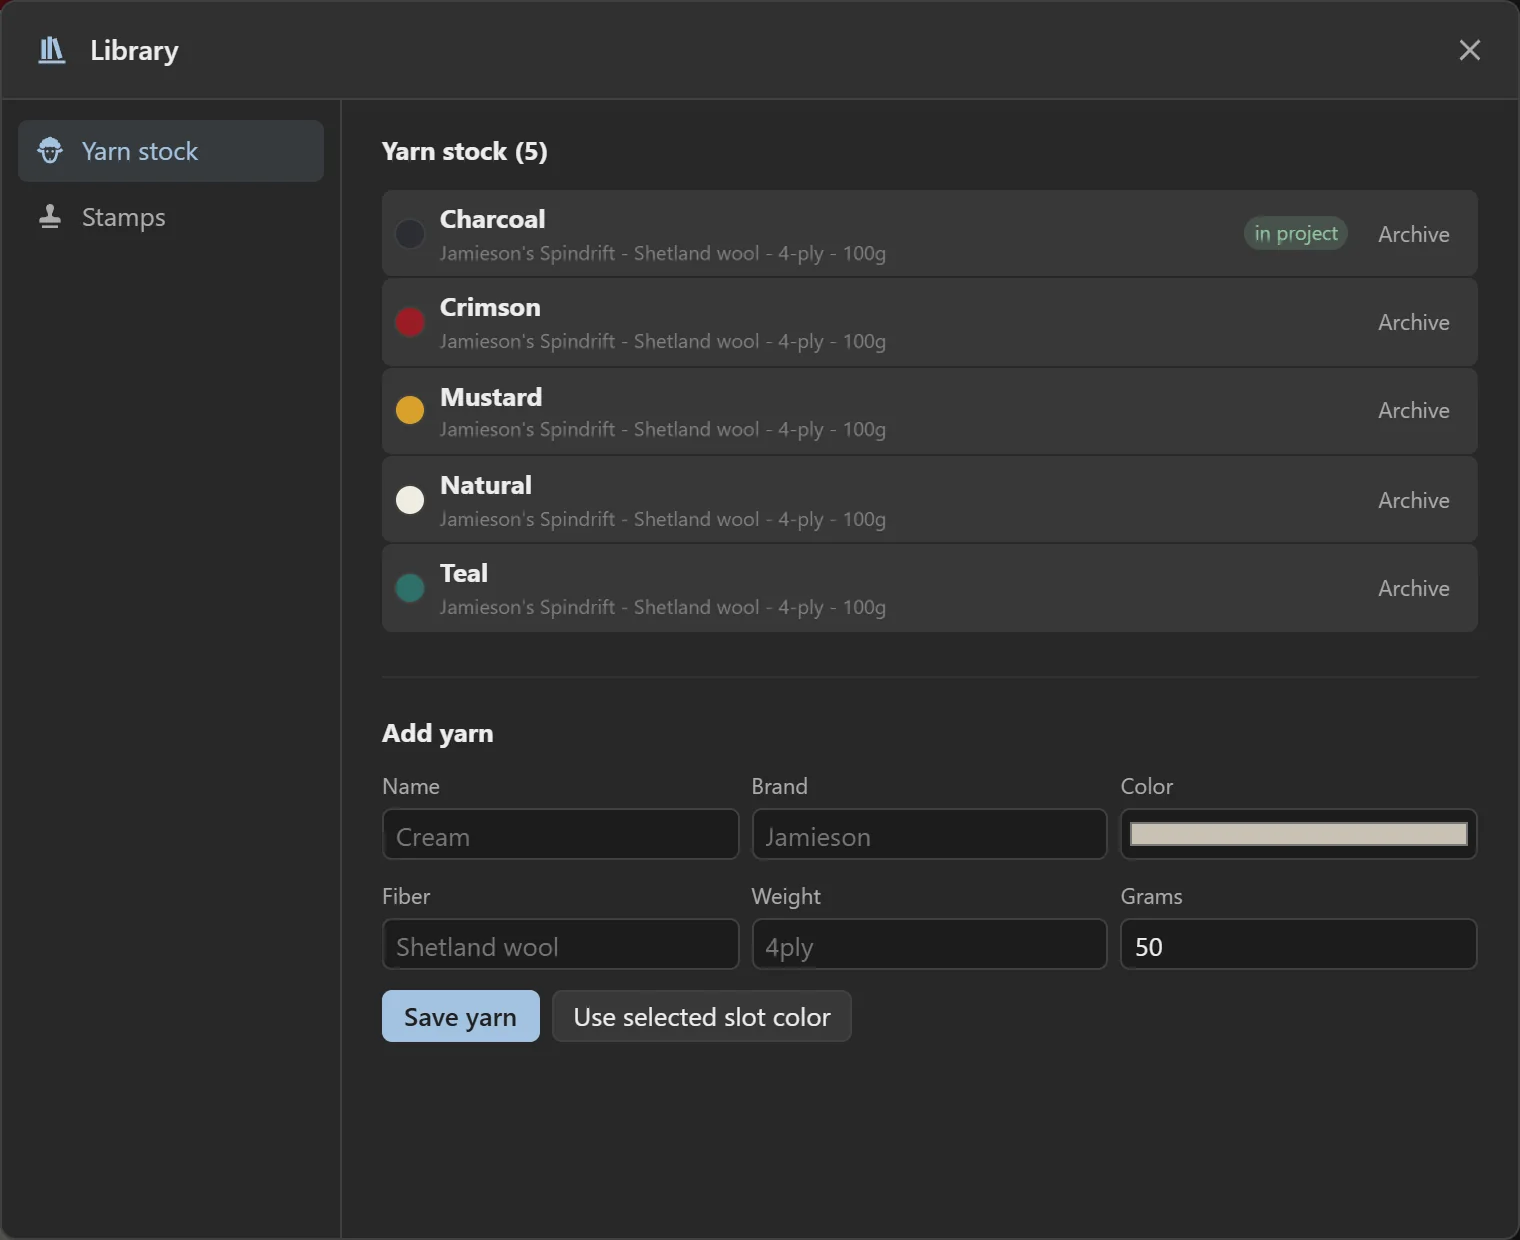
Library in the toolbar holds things shared by every project.
The hat calculator
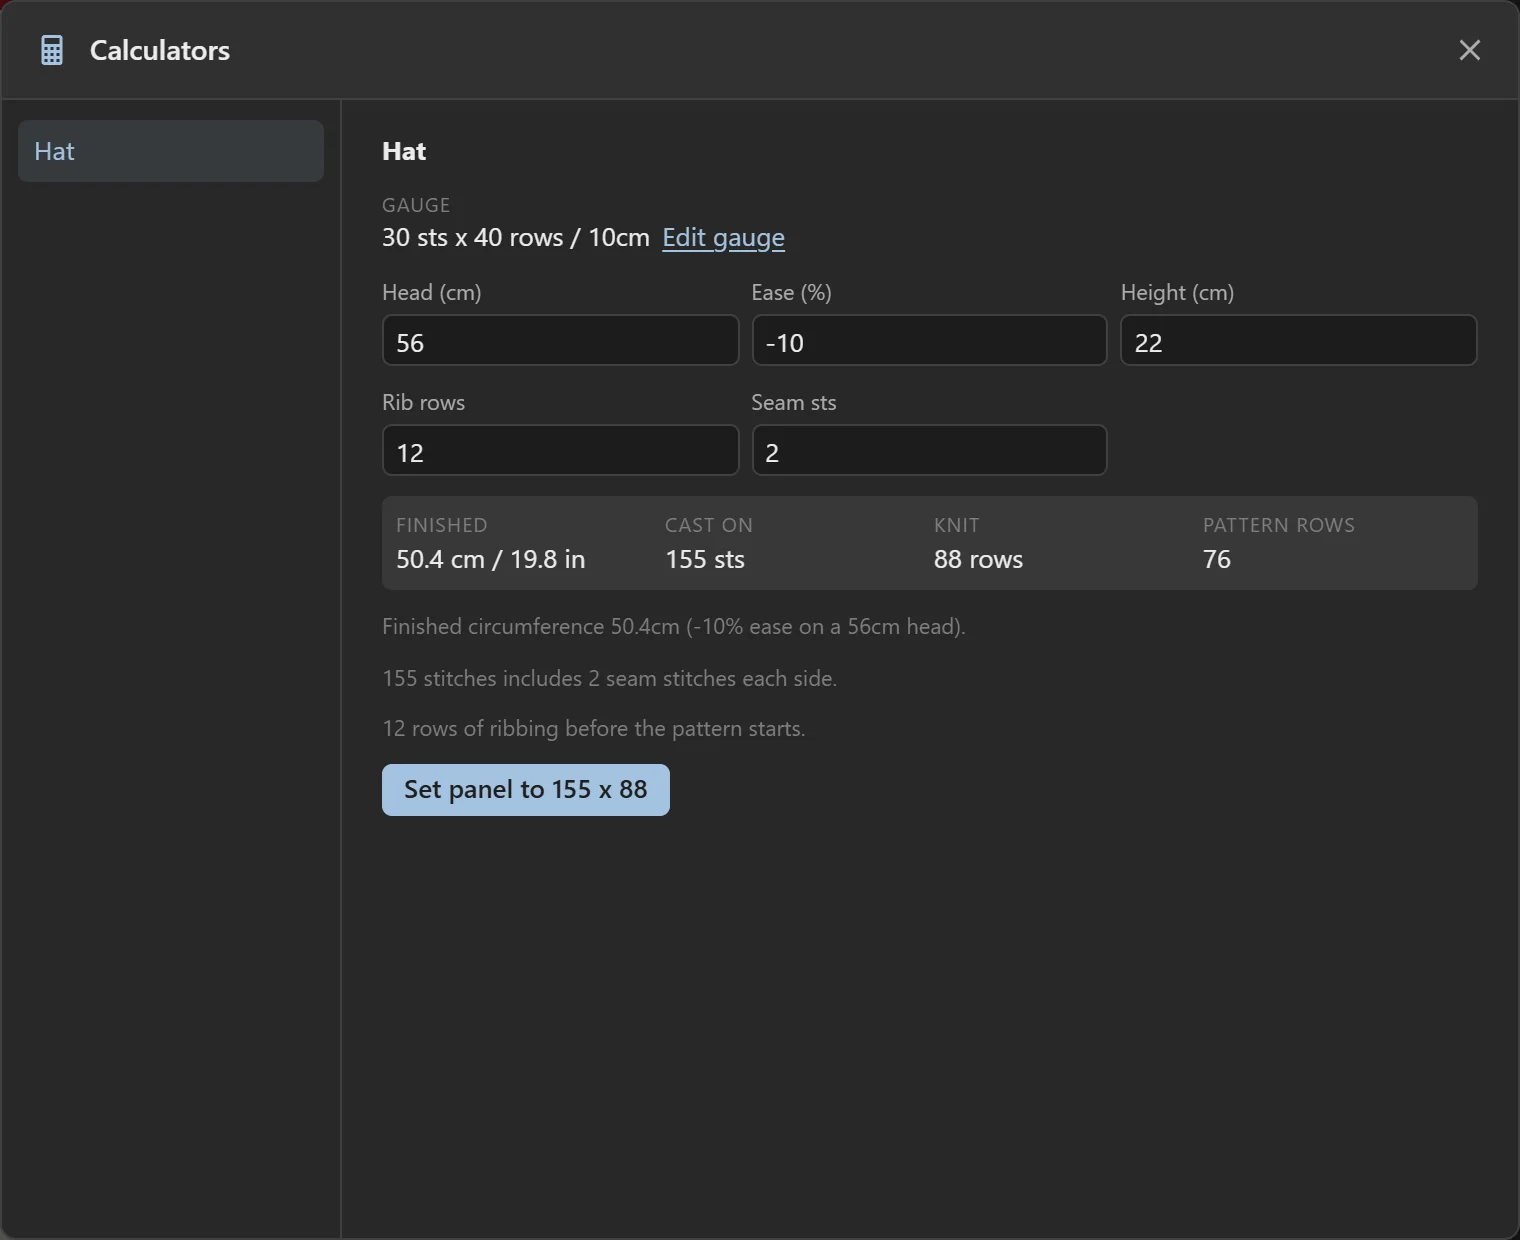
Calculators › Hat works out the panel size for a hat from a head measurement and your gauge.
Enter the head circumference in cm, the ease (how much smaller than the head the hat should be, in percent), the height, the number of rib rows and the seam stitches. Then press Set panel to W x H.
The panel is a rectangle. Crown shaping is done at the machine.
Saving and opening
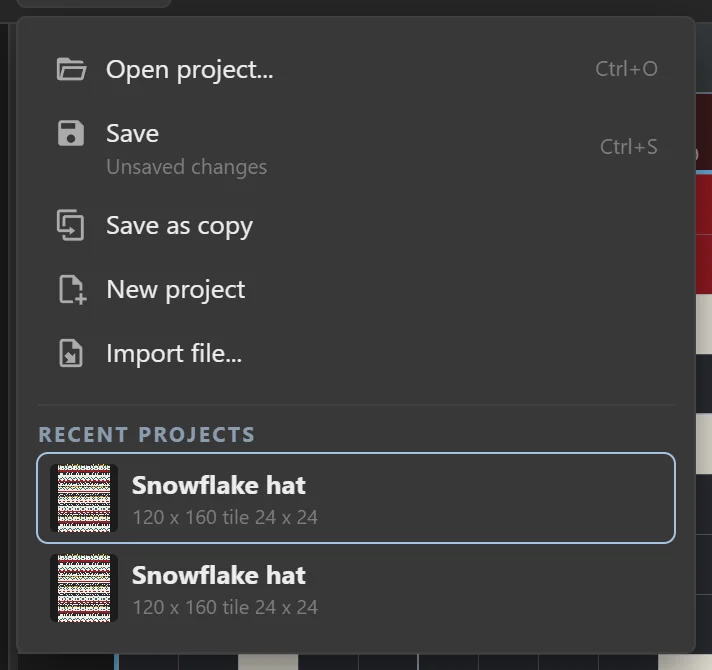
Save (Ctrl+S) stores the project in the app. The button is highlighted while there are unsaved changes.
The File menu also has:
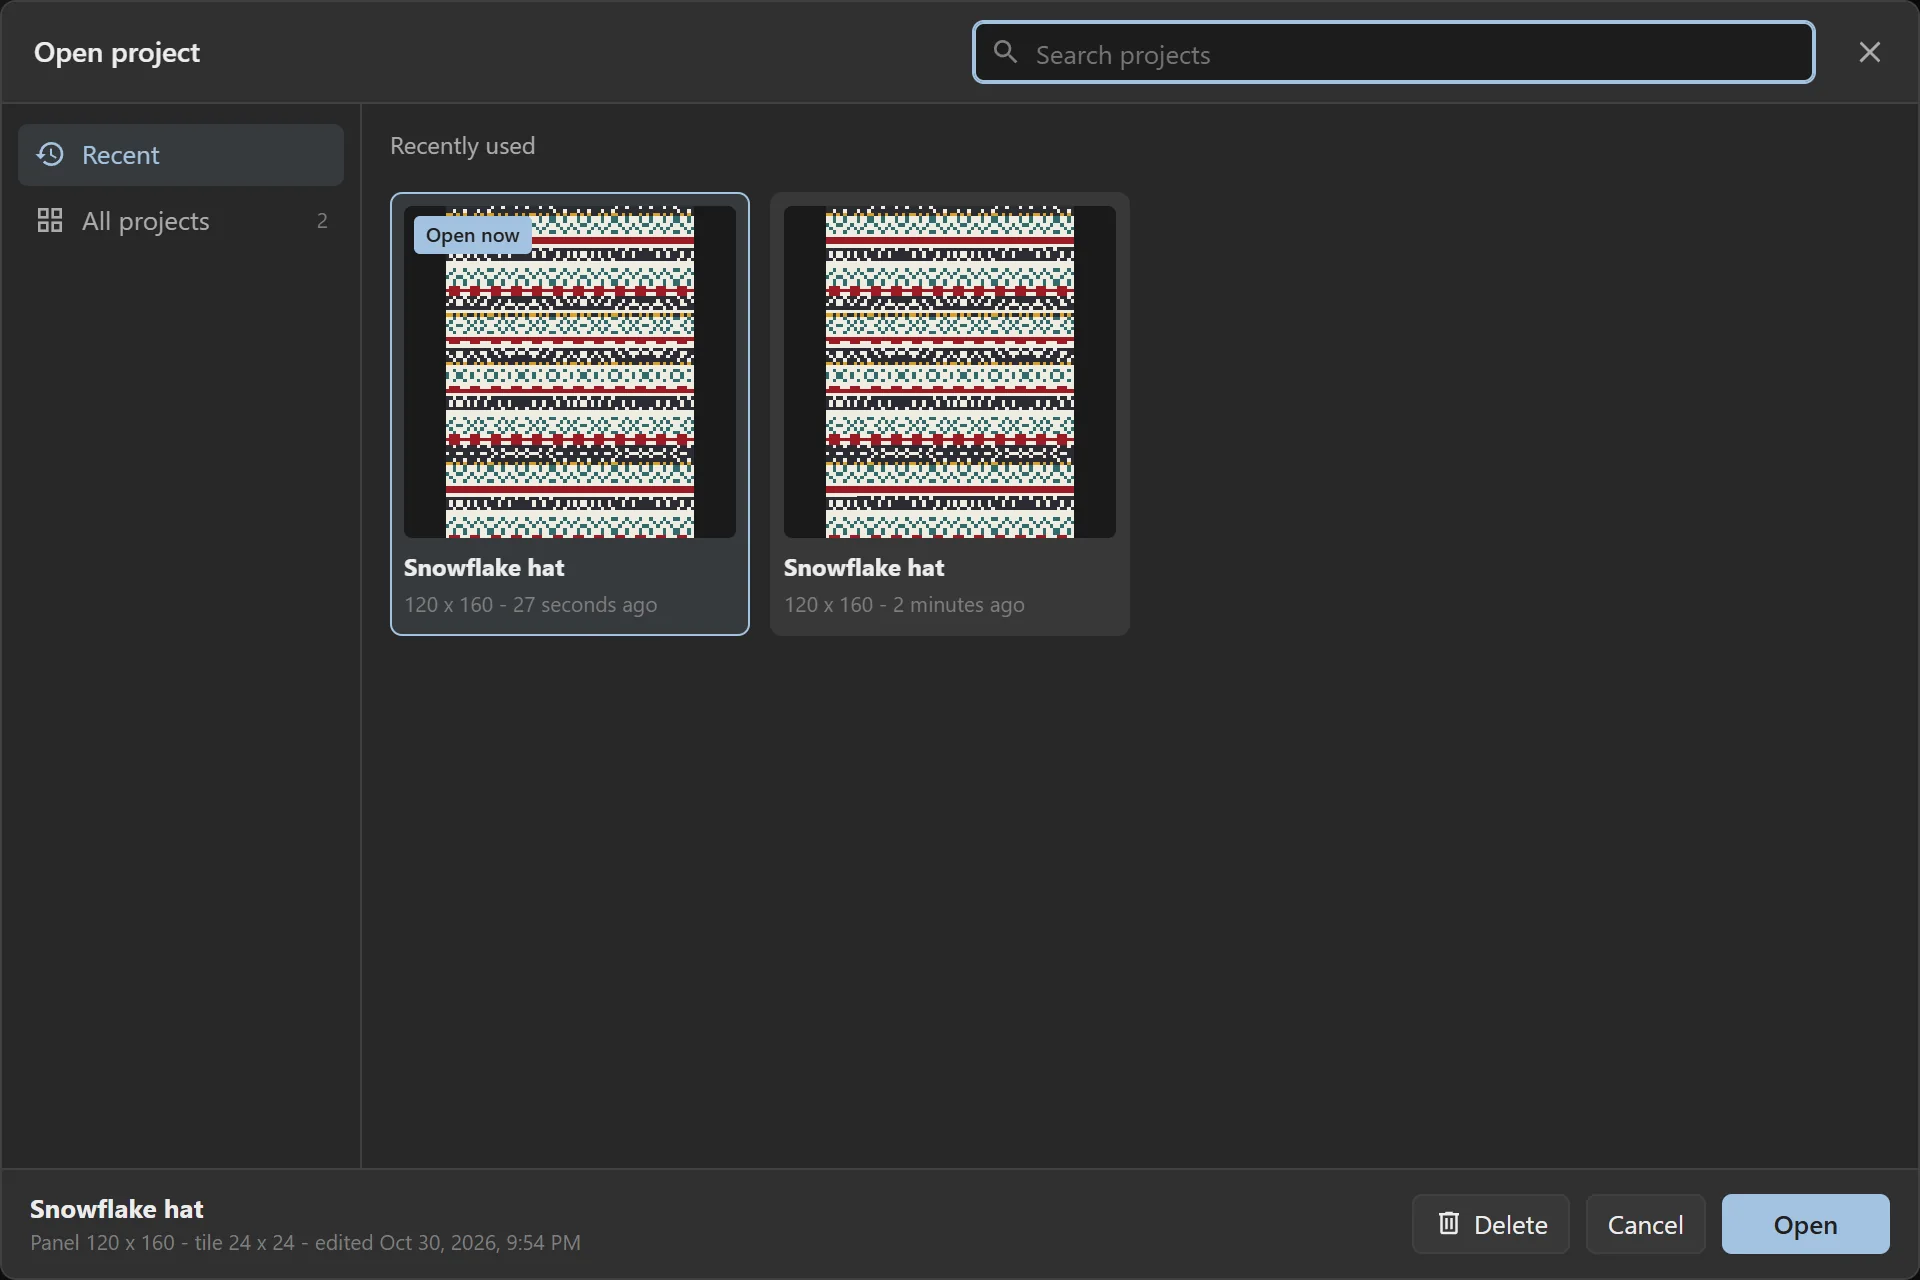
- Open project… (Ctrl+O): browse and search everything you've saved.
- Save as copy and New project.
- Import file…: load a
.knitproj.jsonbackup. - Recent projects at the bottom.
Exporting files
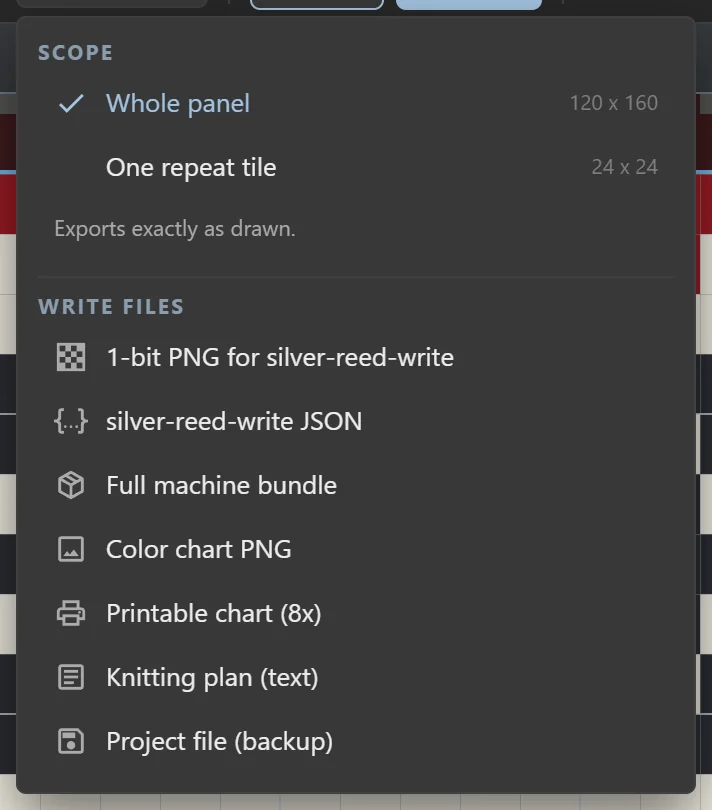
You don't need to export anything to knit with the controller: the knit screen sends the design directly. Export is for sharing, printing, backups, and the original silver-reed-write software.
First choose the scope: the whole panel or one repeat tile.
| File | What it's for |
|---|---|
| 1-bit PNG for silver-reed-write | A black-and-white image, one pixel per stitch. White means the needle is selected (contrast feeder). Never resize it. |
| silver-reed-write JSON | The same pattern plus the yarn pair for every row, in silver-reed-write's format. |
| Full machine bundle | The machine files together. |
| Color chart PNG | A color image, one pixel per stitch. For reference only: don't load it into the machine. |
| Printable chart (8x) | A larger chart for printing. |
| Knitting plan (text) | A plain-text list of the rows where the threading changes, counted from the cast-on edge. |
| Project file (backup) | A .knitproj.json file you can import again later. |
The machine files are always Fair Isle files, because silver-reed-write only does single-bed Fair Isle. Exported images look exactly like the chart on screen, with row 1 (the cast-on edge) at the bottom.
Arranging the workspace
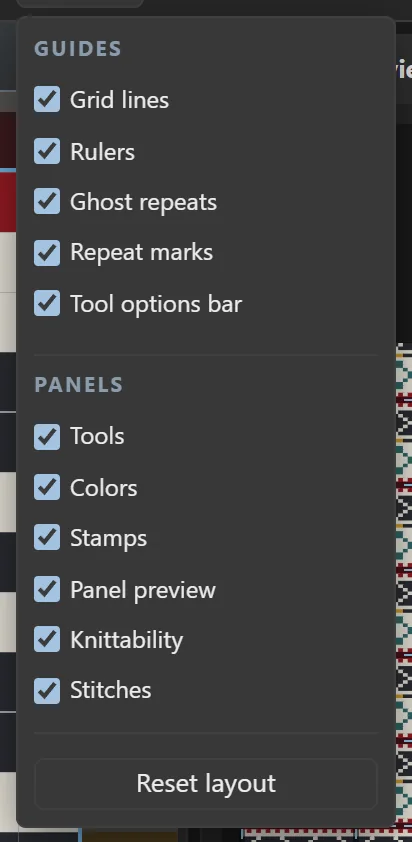
Each panel can be moved, folded up or hidden:
- Fold a panel by clicking its title bar. Click again to open it.
- Move a panel by dragging the dotted handle in its title bar to the left, right or bottom dock.
- Resize the side docks by dragging their inner edge.
The View menu switches the grid guides (grid lines, rulers, ghost repeats, repeat marks and the tool options bar) and each panel on or off. Reset layout puts everything back. A hidden panel can always be found again here.
The layout is remembered by your browser.
Keyboard shortcuts
In the designer
| Keys | What they do |
|---|---|
| Ctrl+Z / Ctrl+Shift+Z or Ctrl+Y | Undo / redo |
| Ctrl+S | Save |
| Ctrl+O | Open a project |
| Ctrl+C / X / V | Copy / cut / paste the selection |
| Delete | Clear the selection |
| Esc | Drop the selection |
| Space + drag | Pan the grid |
| 0 | Fit the tile to the window |
| 1–9 | Pick a color slot (on the stitch layer: knit, tuck or slip) |
| Q | Switch between the color and stitch layers |
| [ / ] | Smaller / bigger brush |
| R / Shift+R | Turn the stamp you're holding |
| Arrow keys | Nudge the stamp you just placed |
| P | Full-window preview |
| K | Open the knit screen |
| B E L R C G T F D X I M H S | Tools (see Drawing tools) |
On the knit screen
| Keys | What they do |
|---|---|
| ↑ / ↓ | Next / previous row |
| Esc or K | Back to the designer (the controller stays connected) |
TinkrkniT · Knitting
Knitting Your first piece
Here's the whole process, from design to knitting. It assumes TinkrkniT is open and the controller is plugged in. Each step links to the section with more detail.
- Draw the design. Pick colors in the Colors panel and draw with the tools. You draw one repeat tile and the app repeats it across the whole panel.
- Check it. The Knittability panel should say Knits as drawn. If it lists rows to fix, click one to jump to it.
- Look at it. The preview shows what the knitted fabric will look like.
- Press Knit. The knit screen replaces the designer. Your design is frozen as a job, so later edits won't disturb it.
- Connect. Press Connect and choose the controller. The log should say
Controller firmware v2: change signals on. - Set the needle markers to match your point cams and press Markers are set to… (more).
- Thread the yarns the yarn card asks for: Yarn A in feeder 1 and Yarn B in feeder 2 (more).
- Start patterning, wait for the dot on the controller, and knit a pass. Keep going, one pass per row.
- Change yarn when asked. The computer chimes, the controller's red and blue lights take turns, and its screen says which yarn to thread, for example
YARN C(more). Change it, then carry on. The signal stops as soon as the carriage enters the pattern again. - Finish. At the last row the screen says
DONEand the app plays a longer chime.
The knit screen
Press Knit in the toolbar (or K) when your design is ready. The designer is replaced by the knit screen. Your chart fills the left side and the cards on the right walk you through each pass.
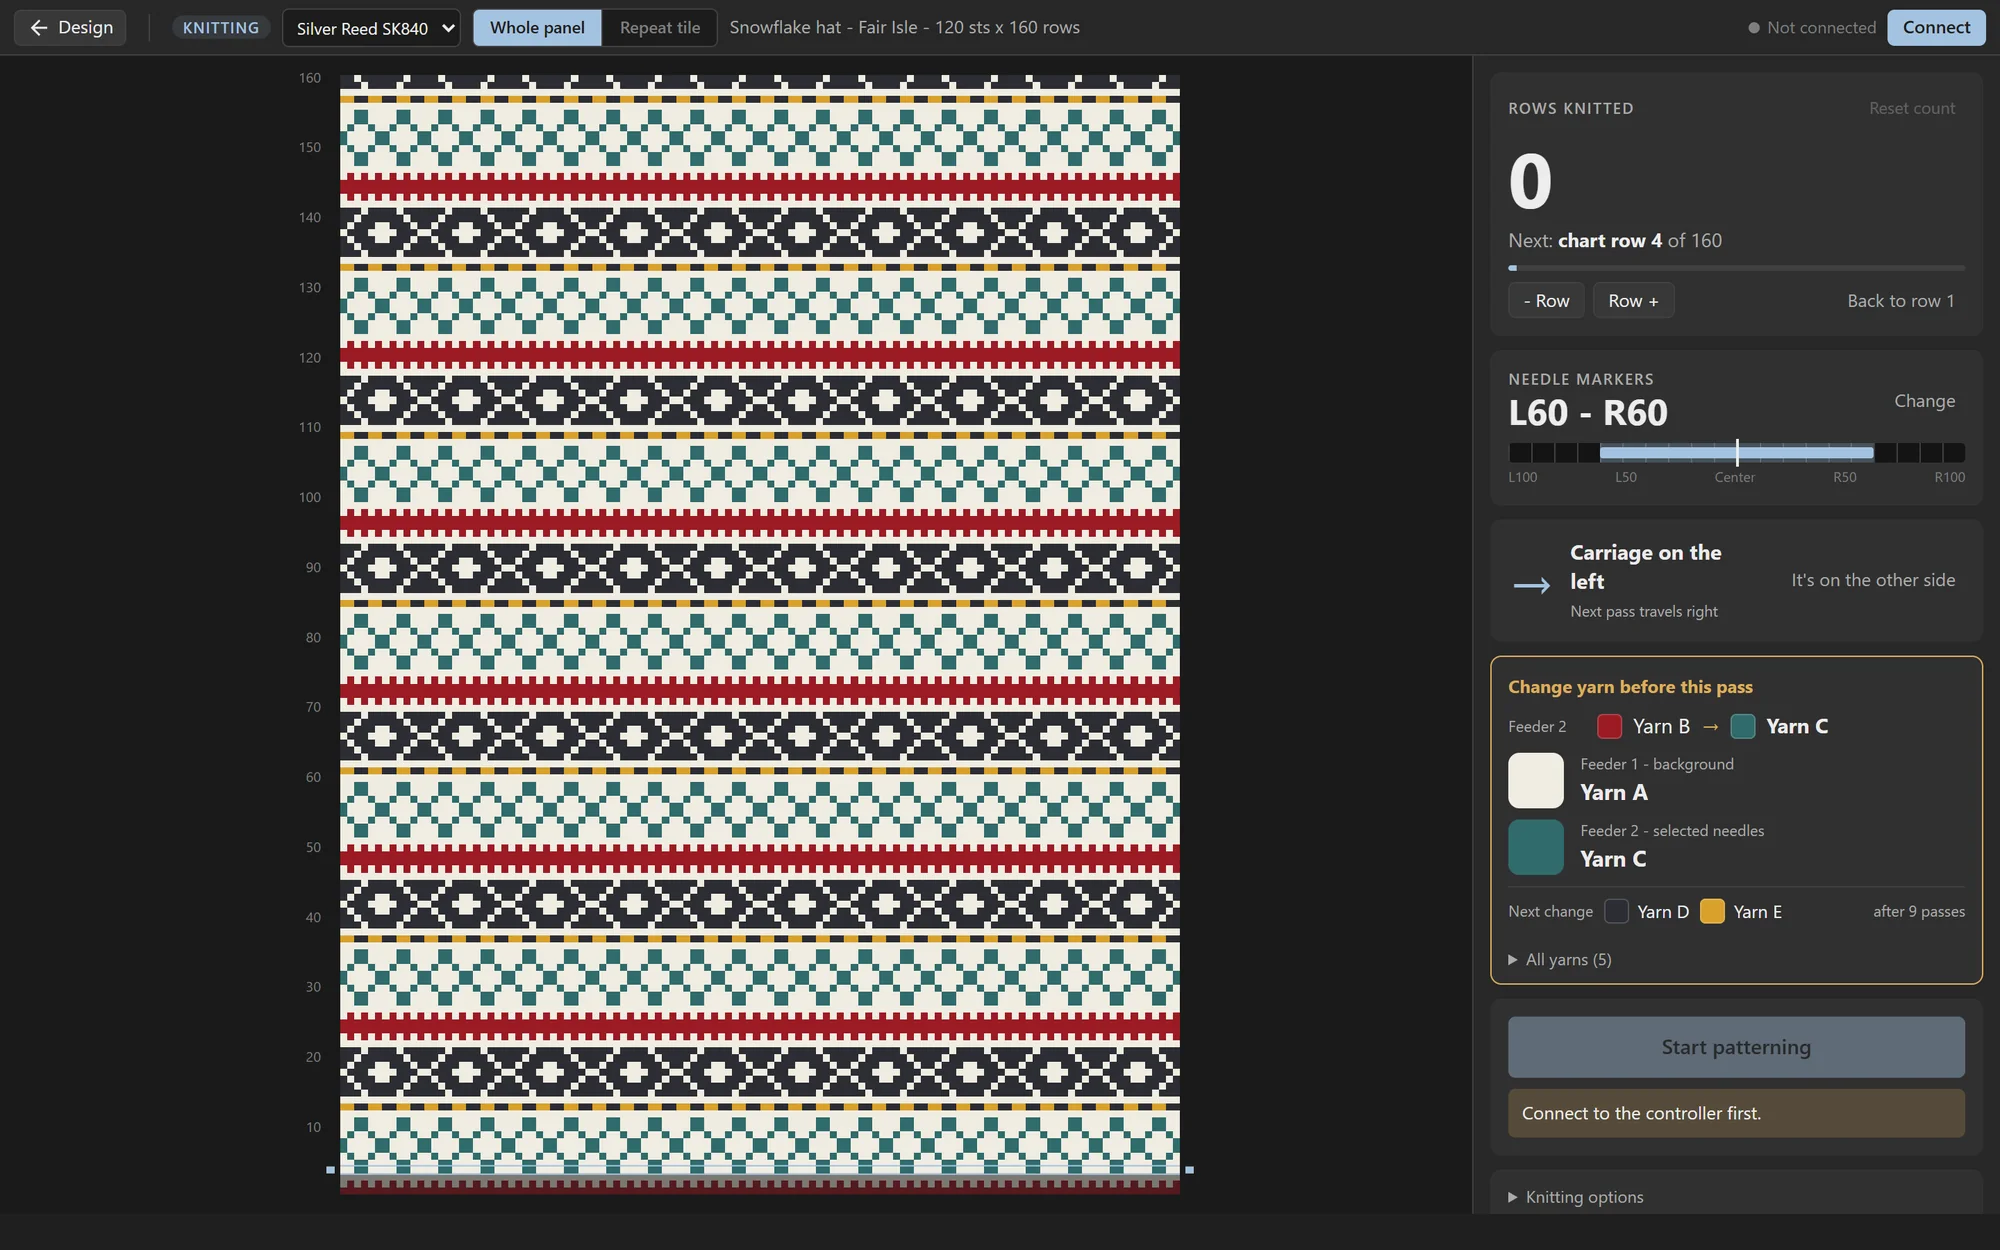
The bar along the top
- Design goes back to the designer. The controller stays connected, so you can go back and forth freely.
- Machine: the knitting machine you're using. Only the Silver Reed SK840 is supported for now.
- Whole panel / Repeat tile: knit the whole design, or fill every needle between the markers with the repeat tile and keep going up forever. Repeat tile is handy for a test swatch or a piece of a different width.
- The design's name, technique and size.
- Connected / Not connected, and the Connect button.
The sidebar
- Rows knitted: the big number, and the chart row that comes next. See Rows and the carriage.
- Needle markers: where on the bed the pattern sits. See Setting the needle markers.
- Carriage: which side the carriage is on and which way the next pass goes.
- Yarns: what's in each feeder, what to change before this pass, and the next change coming up. See Yarns and changes.
- Start patterning / Stop patterning.
- Knitting options and the Controller log, which fold open. See Knitting options and log.
Start patterning stays greyed out until the markers are confirmed and the controller is connected. The note underneath says which is missing: Confirm the needle markers first or Connect to the controller first.
Your place is remembered. If you close the tab or reload, the knit screen comes back on the same row.
Connecting the controller
- Plug the controller into the computer with a USB cable that carries data.
- Press Connect in the top-right corner of the knit screen.
- The browser lists the serial ports. Pick the controller (it usually has USB, CP210x or CH340 in its name) and press Connect.
- The pill turns to Controller connected. Opening the connection restarts the controller, so its screen goes back to
ROW 0.
The app then asks the controller which version of the firmware it's running, and the Controller log says one of:
| Log message | What it means |
|---|---|
Controller firmware v2: change signals on. | Everything works, including the yarn and carriage change signals on the controller's lights and screen. |
Controller has no change signals (older firmware). | Patterning works, but the controller won't warn you about changes. The app still shows them and chimes. Update the controller's firmware to get them. |
Disconnect closes the connection. Stop patterning first.
Setting the needle markers
The needle markers say which needles on the bed the pattern covers. They use the numbers printed on the bed: L1–L100 left of center and R1–R100 right of center.
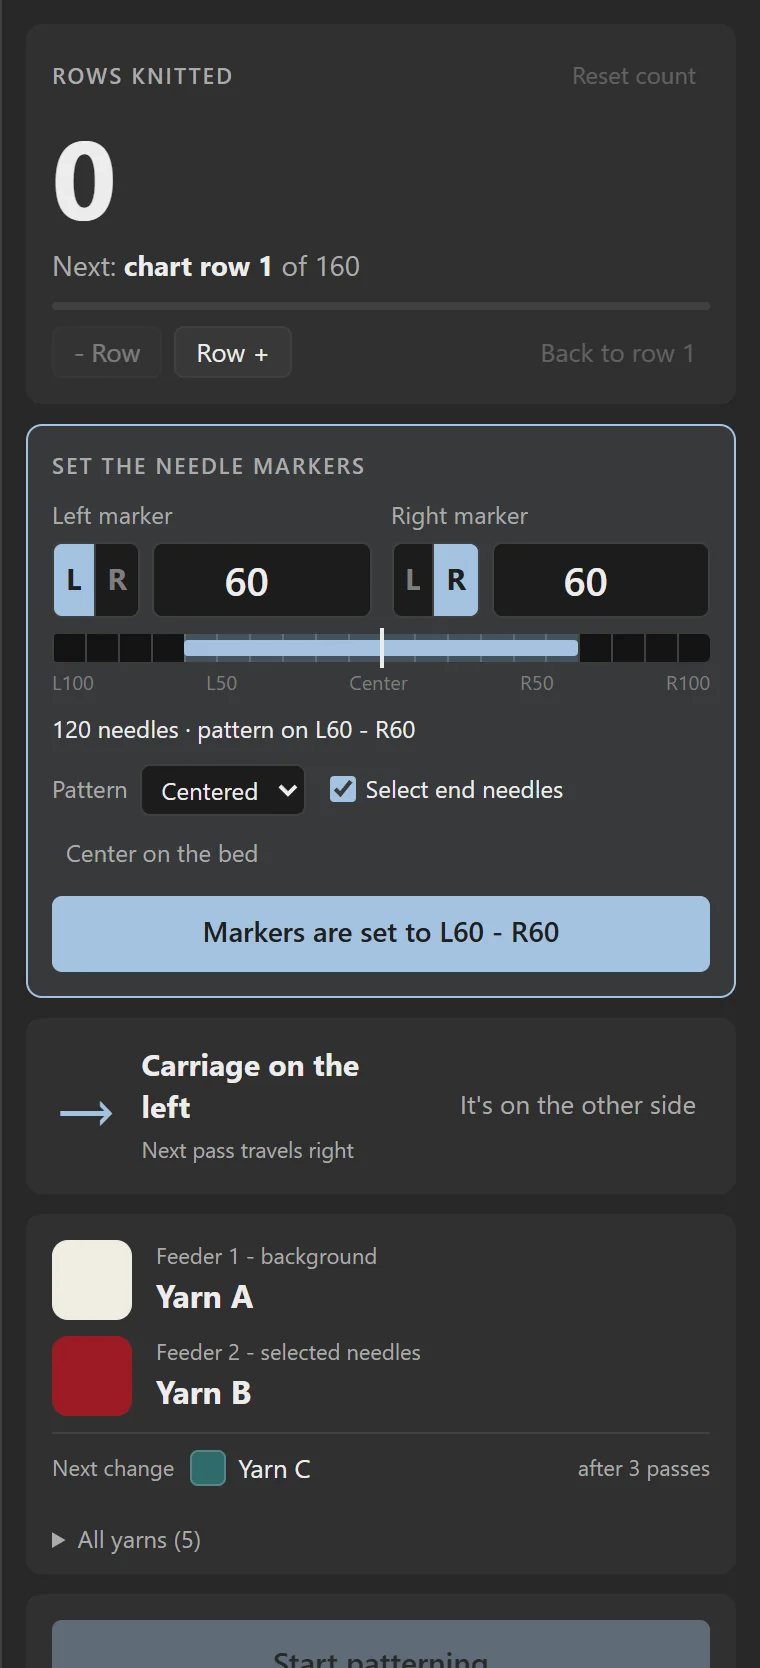
Setting them is easy to forget, so until you've confirmed them the card is open and highlighted, and you can't start patterning.
- Choose where the pattern sits with Pattern: Left, Centered or Right. For a repeat tile it's Repeat from instead. Center on the bed puts it back in the middle.
- Or type the needle numbers into Left marker and Right marker, choosing L or R for each. The strip below shows where that is on the bed.
- Move the point cams on the machine to those needles.
- Press Markers are set to… to confirm.
Select end needles knits both edge needles in feeder 2, so both yarns are caught at the edges.
Once confirmed, the card shrinks to show the range (for example L60 – R60). Press Change to move them. Any change has to be confirmed again.
If the panel is wider than the machine's bed, the card tells you.
Rows and the carriage
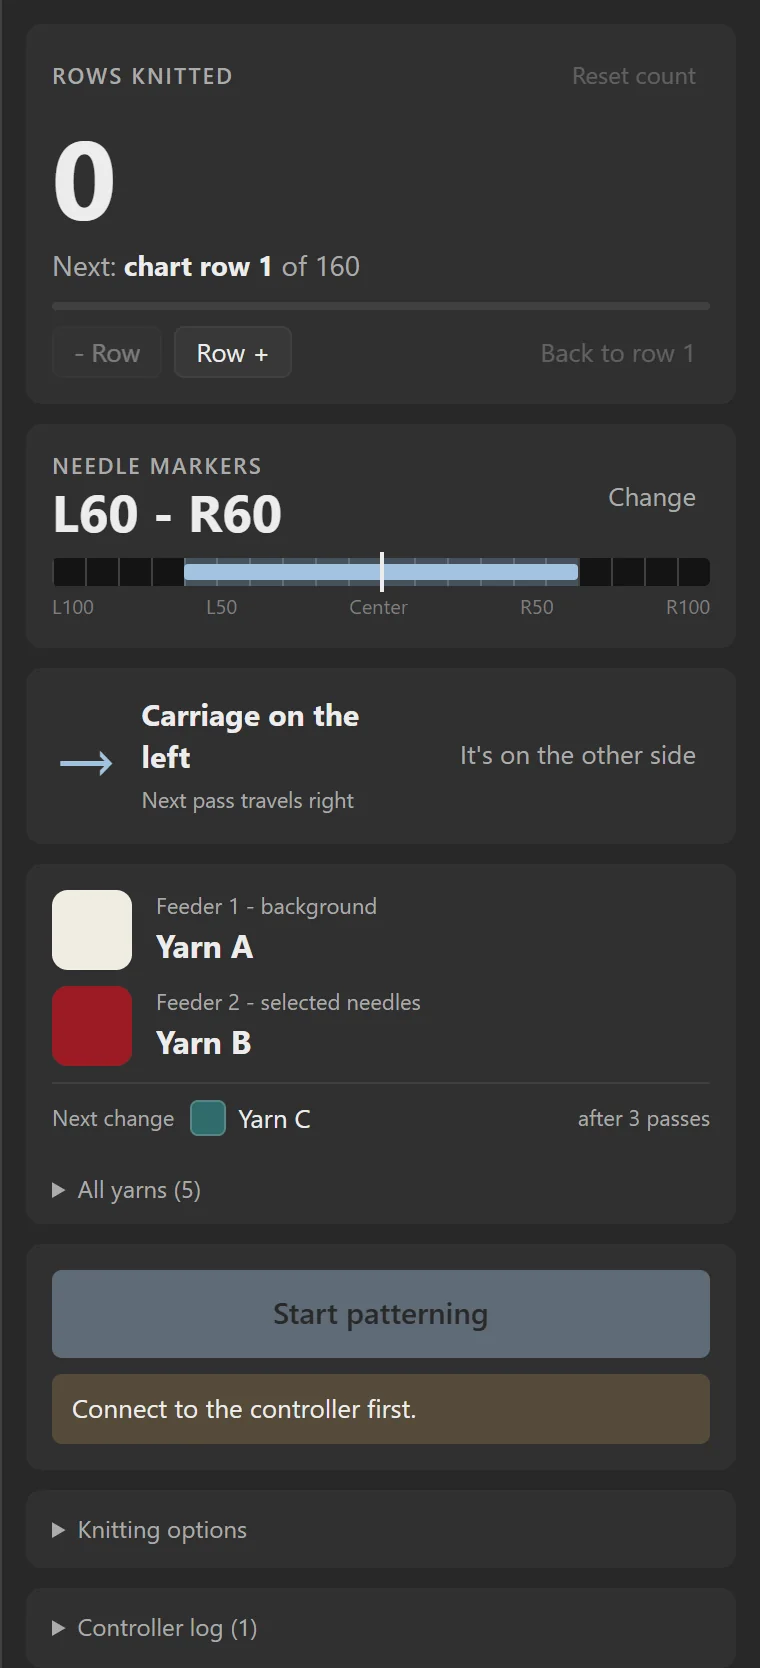
Rows knitted is the big number. It counts passes from 0, the same way the machine's own row counter does, so reset both together with Reset count.
Underneath, Next: chart row 4 of 160 is where you are in the design, with a progress bar.
- Row + and − Row (or the ↑ and ↓ keys) move one row. Back to row 1 starts again.
- You can also click a row on the chart to knit it next.
The Carriage card shows which side the carriage is on and which way the next pass goes. The app follows it as you knit. If it ever gets it wrong, press It's on the other side.
For every technique except Fair Isle, the card also says how to set the carriage, for example Carriage: Tuck buttons in.
The row number on the controller's screen and the row the app is on are separate. Resetting one doesn't change the other, and the app is the one that decides what gets knitted next.
Yarns and changes
On the knit screen, each color in your design gets a yarn letter, in the order they're first knitted: the first is Yarn A, the next Yarn B, and so on. The same letters appear on the controller's screen, so you always know which cone to reach for.
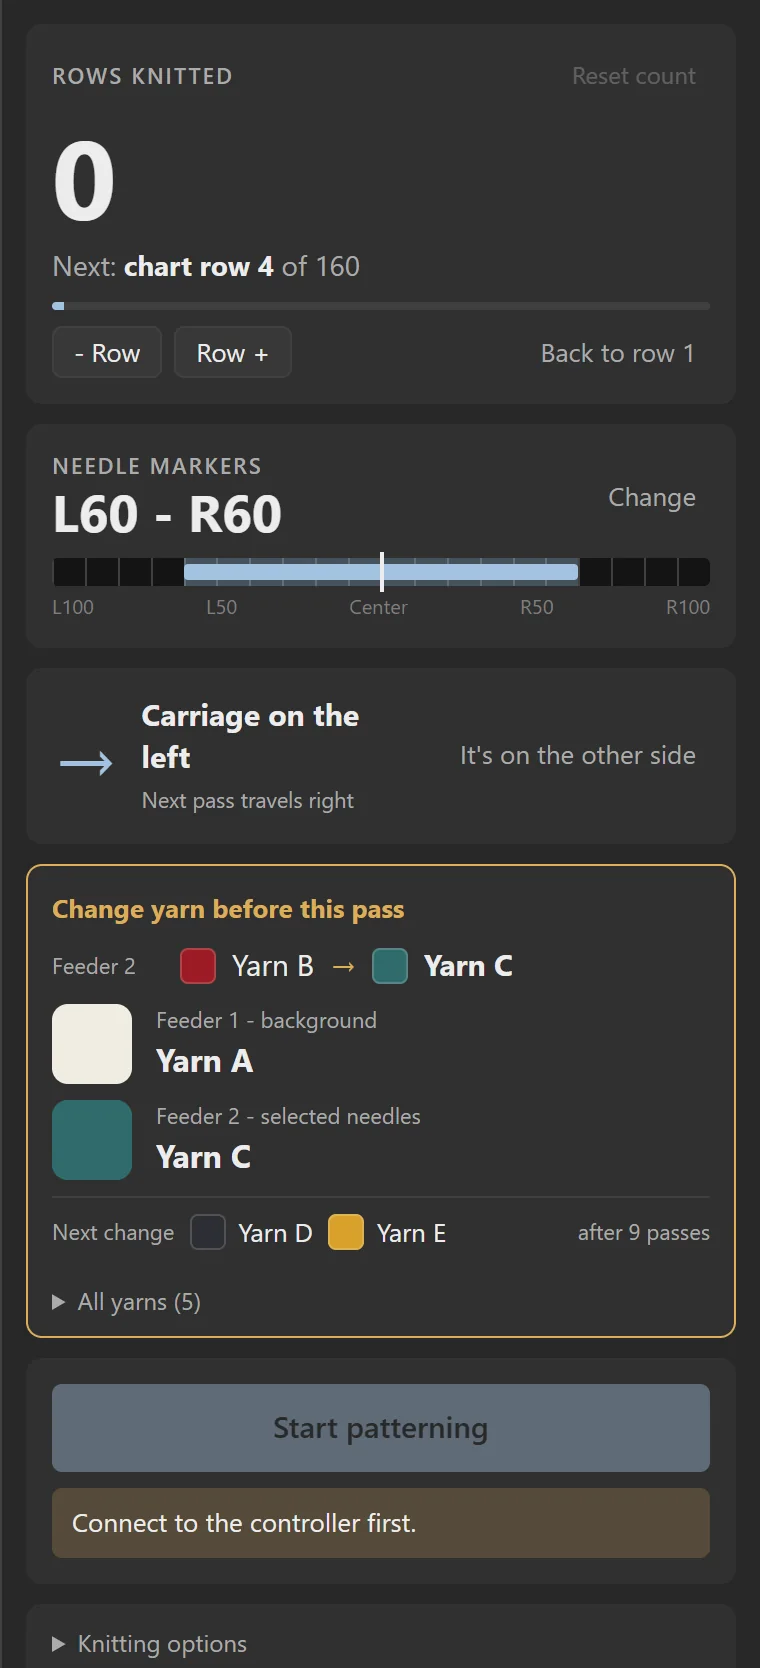
The yarn card shows:
- Feeder 1 – background and Feeder 2 – selected needles: what should be threaded now.
- Change yarn before this pass (with an amber outline) when the next pass needs something different, for example Feeder 2: Yarn B → Yarn C. On a one-yarn pass it also says which side the new yarn hangs, and whether to cut the old one or leave it parked.
- Carriage: the cam setting, and Change the carriage when that changes.
- Next change: the change after this one, and how many passes away it is.
When a change comes up
As the carriage finishes the pass before a change, three things happen together:
- The computer plays a chime (a longer one when the panel is finished).
- The controller's red and blue lights take turns, half a second each.
- The controller's screen shows what to do instead of the needle count, for example
YARN C.
Make the change, then knit on. The signal stops as soon as the carriage enters the pattern area. There's no need to press anything: the next row has already been sent. See Yarn and carriage changes for everything the controller can show.
Matching letters to your cones
Click All yarns at the bottom of the yarn card to see which letter knits each design color.
- Give two design colors the same letter to knit both from one cone.
- Click a feeder color chip to change the color shown for that yarn, for example to match what's really on the cone. This doesn't change your design.
- Reset yarns goes back to the design's colors and letters.
The letters and colors are remembered for the next job, as long as the design's palette hasn't changed.
Knitting options and log
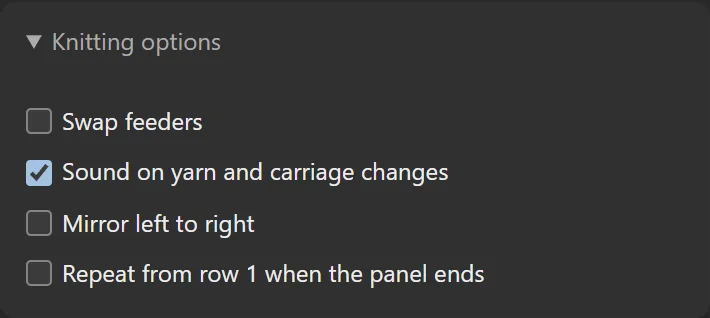
Click Knitting options to open it.
| Option | What it does |
|---|---|
| Swap feeders (Fair Isle) | Turns every row inside out, so the two yarns change feeders. Use it if main and contrast come out the wrong way round. |
| Invert stitch selection (other techniques) | Swaps which needles knit and which tuck or slip. Knit a small swatch first, and turn this on if the tucks or slips land where the knit stitches should be. |
| Sound on yarn and carriage changes | The chimes. Turning it on plays one so you can check the volume. |
| Mirror left to right | Flips the pattern across the bed. Leave it off to knit the chart the right way round on the knit side. |
| Repeat from row 1 when the panel ends | Starts the design again instead of stopping at the end. |
| Backing (Jacquard) | Overrides the design's jacquard backing for this job only. |
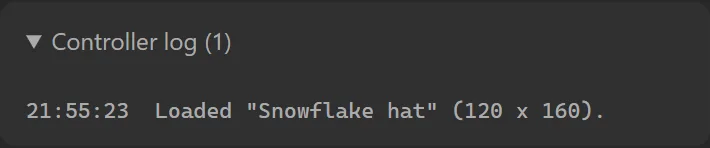
The Controller log lists what the app and the controller have said to each other: loading the design, connecting, the firmware version, and the controller's status messages. It's the first place to look when something isn't working.
Editing the design mid-piece
When you press Knit, the design is frozen as a job. Editing the design afterwards never changes rows that are already queued.
To knit your changes, go back to the designer, edit, and press Knit again:
- If nothing has changed, you just go back to the knit screen.
- If it has changed and you haven't knitted anything yet, the new version replaces the old one.
- If you've already started knitting, a banner asks: Load the new design or Keep knitting this. Stop patterning before loading the new one.
The browser asks before closing the tab while you're patterning, so you can't lose your place by accident.
TinkrkniT Controller · Usage
Everything you need to use the controller.
Setting up the controller
- Open TinkrkniT in Chrome or Edge (see Getting the software).
- Plug in. Connect the carriage cable to the controller, then connect the controller to your computer with a USB cable. The screen will show
ROW 0. - Open the knit screen and connect. Press Knit in the app, then Connect, and pick the controller's USB connection. Make sure no other program is using that connection. See Connecting the controller.
- Set your point cams. These are the two markers on the needle bed that tell the carriage where patterning starts and stops. Place them at the needles the knit screen shows (for example L60 and R60), so they cover exactly as many needles as your design is wide.
- Wait for the dot. A small dot flashes in the top-left corner of the screen when a row arrives. Once you've seen it, make one pass with the carriage. Repeat for every row.
If you'd like to check everything before a real piece, push the carriage across the bed once with nothing loaded. The needle count on the screen should climb up to your design width. The controller uses this first pass to measure how wide your knitting is, so until you've done one pass it shows a plain count with no total.
What's on the box
| Part | What it's for |
|---|---|
| Screen | Shows which row you're on, how far across you are, and which yarn to thread next. |
| Button | Resets the row count and opens the extra screens. |
| Blue and red lights | Tell you at a glance whether things are going well, and flash in turn when it's time to change yarn. |
| USB port | Connects to your computer. It also powers the controller. |
| Round carriage socket | Where the cable from the carriage plugs in. |
Reading the Screen
This is the screen you'll see most of the time. Here are the main elements:
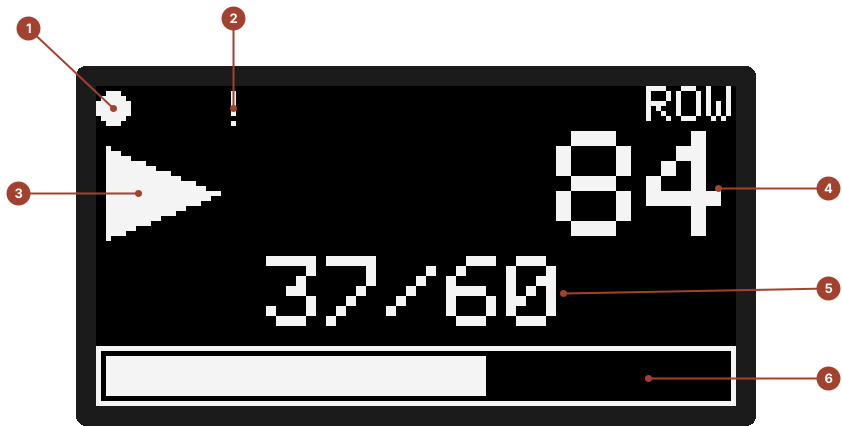
- The dotA new row has just arrived from your computer.
- The
!markSomething needs a look. See Controller problems. - The arrowShows which way the carriage is travelling. It's solid while you're patterning and an outline when you're not.
- Row numberHow many rows you've knitted so far.
- Needle countHow many needles you've passed in this row, out of the total. Between passes, this line shows the next yarn or carriage change instead.
- Progress barFills up as you cross the bed.
What you'll see as you knit
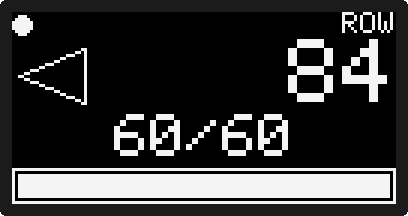
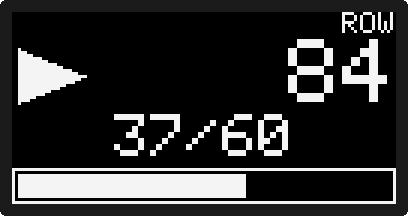
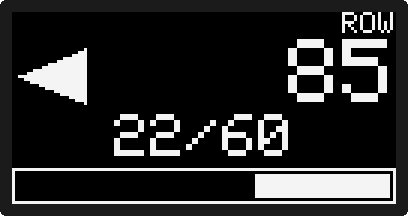
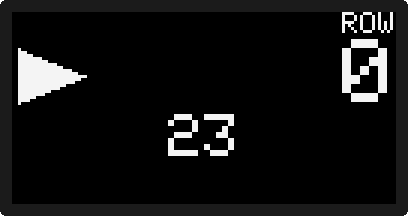
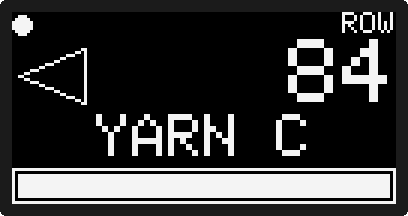
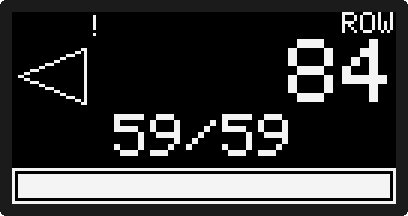
! is lit.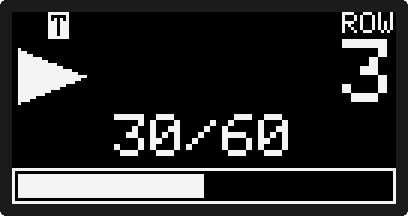
T shows the controller is knitting its own checkerboard (see the test pattern).Yarn and carriage changes
When TinkrkniT knows the next pass needs a different yarn or carriage setting, it tells the controller along with the row. While the carriage waits at the side, the controller then:
- Alternates the red and blue lights, half a second each (the small light on the circuit board blinks with the blue one).
- Replaces the needle count with what to do.
YARN C: thread yarn C, as named on the knit screen.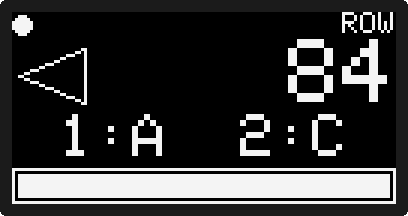
1:A 2:C: yarn A in feeder 1 and yarn C in feeder 2.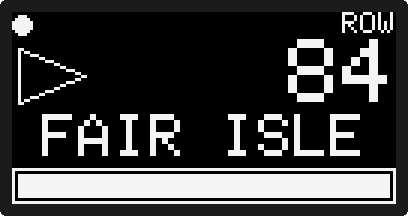
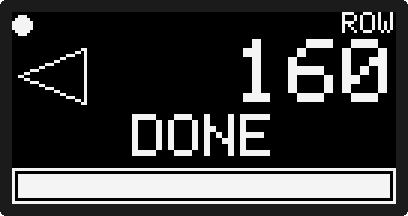
DONE: the last row of the panel has been knitted.| The screen says | What to do |
|---|---|
YARN C | Change to yarn C. Only one feeder is in use on this pass, or only one changes. |
1:A 2:C | Feeder 1 takes yarn A and feeder 2 takes yarn C. |
PLAIN, FAIR ISLE, TUCK, SLIP or JACQUARD | Set the carriage's buttons for that technique. |
SET CAM | Set the carriage as the knit screen says (the app asked for a setting this firmware doesn't have a name for). |
| Yarn and carriage together | The screen switches between the yarn and the carriage setting every second. |
DONE | The panel is finished. |
? instead of a letter | The yarn number is beyond Z. Check the knit screen. |
The signal stops when the carriage enters the pattern area (you've made the change and started knitting) or when the app cancels the row. While it's showing, the lights show the change rather than the red warning flash, but the ! stays on the screen, so you won't miss a warning.
This needs controller firmware version 2 and TinkrkniT. With older firmware, or other software, the controller simply knits and doesn't signal changes.
The rhythm of knitting
Every row follows the same four steps:
- The row arrives. Your computer sends the next row and the dot blinks. If the row needs a yarn or carriage change, the lights start taking turns.
- You push the carriage into the pattern area. The arrow turns solid, the needle count starts from 0, and any change signal stops.
- The controller picks needles. As the carriage passes each needle, the controller tells it whether to select that one. The blue light flickers in time, and your computer shows live progress.
- The carriage leaves the pattern area. The row counter goes up by one, and the computer sends the next row.
Each row is used only once. If you move the carriage before the next row has arrived, that pass knits plain and the controller says No pattern ready.
The row number on the screen is just for you. Your software keeps its own record of where you are in the design, so resetting the number on the screen doesn't change what gets knitted next.
Right-to-left rows are flipped automatically. The software takes care of this, so you don't need to think about it.
The button
Just one button does everything. (The BOOT button on the circuit board works the same way once the controller is running.)
| When you're on… | Do this | And this happens |
|---|---|---|
| The knitting screen | Press and hold for 1 second | The row counter goes back to 0. The lights glow magenta while you hold, then flash twice to say it worked. Your knitting isn't affected. |
| Tap 4 times, quickly | Opens the diagnostics screen. | |
| The diagnostics screen | Tap once | Takes you back to the knitting screen. |
| Press and hold for 1 second | Turns the test pattern on or off. |
A tap is a quick press (under half a second). If you tap a fifth time, it won't bounce you straight back out of diagnostics.
The lights
The two lights in the button above the screen show the most important thing going on right now. If more than one thing is happening, the one higher in this list wins.
Magenta
You're pressing the button. Two quick flashes means the row counter was reset.
Red and blue alternating
Change yarn or the carriage setting before the next pass. Look at the screen to see what. It stops when you start the pass.
Red flashing
There's a warning. Check the screen for the !.
Blue flicker
Needles are being picked. This is normal while you knit.
Off
Nothing to report, or a pass with no needles selected.
Built-in safety
The needle selector in the carriage is a small electromagnet (a solenoid). It's meant to switch on in short bursts as the carriage passes each needle, and it can overheat if it stays on. The controller looks after this for you, so there's nothing to set up.
- It's off whenever nothing is happening. The selector is switched off at start-up, at the end of every row, and whenever no row is loaded.
- It switches off if the carriage stops mid-row. If the selector has been on for 3 seconds without a break, the controller switches it off, flashes the red light and shows
SAFETY: OUT off. - Damaged rows are never knitted. A row that arrives incomplete or garbled is thrown away and reported, and the pass knits plain.
The 3-second cut-off isn't permanent. When you start moving again, the next selected needle switches the selector back on and the row carries on. Check the fabric where you stopped. Pushing the carriage very slowly across a long run of selected needles can also trigger it, so knit at a steady pace.
Trying it out without solenoid power: you can leave the 16 V supply disconnected. Everything else works as normal, and the blue light shows exactly when the selector would have fired.
The full list of safeguards is in How the controller protects your machine, in Controller Hardware.
The built-in test pattern
The controller can knit a pattern on its own. This is handy for checking that the carriage, cable and needle selector are all working. It makes a checkerboard of 3×3 squares: 3 needles selected, then 3 not, swapping every 3 rows.
- Knit one plain pass first so the controller learns the width. Otherwise it assumes the maximum of 200 needles, and right-to-left rows won't line up.
- Open the diagnostics screen (4 quick taps), then hold the button for 1 second. The bottom line says
TEST MODE ON, and theTsymbol appears on the knitting screen. - Tap once to go back to the knitting screen, then knit as normal.
- To stop, open diagnostics again and hold for 1 second.
If a row arrives from your computer, test mode switches off by itself and the computer's row is used. The checkerboard follows the row counter, so resetting the counter restarts the squares.
The diagnostics screen
Tap the button 4 times quickly to open this screen. It shows the computer link, the carriage signals and the current row, in small text. It's the first place to look when the ! warning appears.
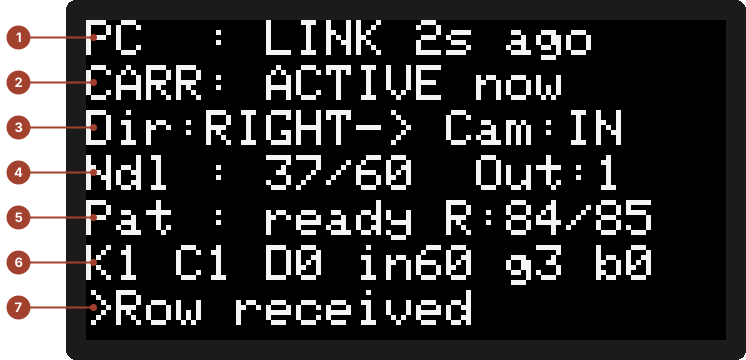
- Computer link
LINKmeans data arrived in the last 15 seconds.idlemeans it's connected but quiet.nonemeans nothing has arrived since power-up. - Carriage activity
ACTIVEif the carriage signals changed in the last 3 seconds, otherwisequiet. - Direction and camsWhich way you're travelling, and whether you're inside (
IN) or outside (out) the pattern area. - Needles and outputNeedles counted this row, out of the length of the loaded row.
Out:1means the needle selector is being driven right now. - Pattern and rowsWhether a row is waiting (
ready), there is none (none), or the test pattern is on (TEST).R:is rows knitted / rows received. - Signal checkLive readings from the carriage wires, explained below.
- Last eventThe most recent thing that happened. It starts with
!instead of>while a warning is active.
Using the signal check line
The line starting K C D in g b shows the carriage's three wires. With the carriage still, you see their current state (0 or 1). Move the carriage slowly and watch them change:
K(point cam) should switch to 1 as you pass the first point cam, and back to 0 at the second.C(clock) should flip once for every needle you pass.D(direction) should change when you reverse. 1 means moving left.inis the number of needle pulses inside the cams on the last pass. It should match your design width.gis the number of electrical noise spikes that were filtered out. If it keeps climbing, the wiring is picking up interference.bis the number of rows whose needle count changed unexpectedly.
If one of them never changes, check the carriage cable is pushed in fully at both ends. If it still doesn't change, the wiring needs a look (see Carriage signals and wiring).
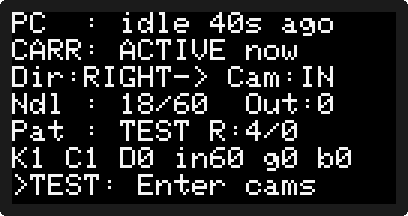
Pat : TEST. The computer is idle and rows received stays at 0.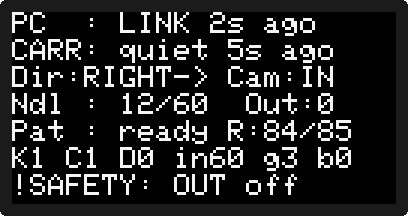
What the status messages mean
These appear on the bottom line of the diagnostics screen. Most are also sent to the control software and show in the TinkrkniT Controller log. Rows marked with ! turn on the warning mark and the red light.
| Message | What it means | |
|---|---|---|
boot | The controller has just started. | |
Row received | A row arrived and is ready for your next pass. | |
Change yarn | The next pass needs a different yarn. The lights take turns and the screen shows which. | |
Change carriage | The next pass needs a different carriage setting. | |
Piece done | The panel is finished. The screen shows DONE. | |
Enter cams | The carriage has entered the pattern area. | |
Row done: 60 needles | A pass finished normally. | |
COUNT 59 (was 60) | ! | This pass counted a different number of needles from the last one. The next good pass shows the message once more as the count returns to normal, for example COUNT 60 (was 59). |
CAMS 60 != ROW 58 | ! | The cams cover a different number of needles than the row the software sent. |
No pattern ready | ! | The carriage entered the pattern area before a row arrived, so that pass knits plain. |
SAFETY: OUT off | ! | The 3-second cut-off was triggered. |
Pattern cleared | The software cancelled the waiting row. Any change signal stops too. | |
Rows reset | You reset the row counter with the button. | |
TEST MODE ON / Test mode off | The test pattern was switched on or off. | |
TEST: Enter cams | The carriage entered the pattern area during the test pattern. | |
Serial timeout | ! | A row started arriving but didn't finish within 1 second, so it was discarded. |
Pattern too long | ! | The software sent a row wider than 200 needles, so it was discarded. |
Unknown command | ! | The controller received something it didn't understand, for example from another program using the same USB connection. |
A warning stays on until the end of the next pass that finishes without a problem.
Help
When the controller looks wrong
Most problems have a simple cause. Find what you're seeing below.
| What you see | What to try |
|---|---|
| The screen stays blank | The controller still knits without the screen. If nothing at all is happening, unplug it and plug it back in without touching the BOOT button. If you built it yourself, check the screen's wiring. |
| The dot never appears | Make sure your USB cable carries data (some only charge), that the right connection is chosen in the software, and that no other program is using it. |
| The needle count stays at 0 | The carriage may not be powered, or its cable may not be pushed in fully. Open the diagnostics screen to check. |
| The arrow never turns solid | Check that your point cams are set on the bed. |
| The arrow points the wrong way | Check the carriage cable is pushed in fully. If you built the controller yourself, the direction wire may be loose or connected wrongly (see Carriage signals and wiring). |
! and a message like CAMS 60 != ROW 58 | The cams and the design are different widths. Move the point cams so they cover exactly as many needles as your design is wide. (The first number is what was counted and the second is what the software sent.) |
! and a message like COUNT 59 (was 60) | A needle was missed or counted twice, so check that row of your fabric. A loose cable, electrical noise, or pushing the carriage very fast can cause this. |
| The pattern shifts sideways on alternate rows | Almost always a width mismatch. Set the point cams to the design width. |
A pass knitted plain (No pattern ready) | The carriage moved before the next row arrived. Wait for the dot each time. |
SAFETY: OUT off | The carriage stopped partway through a row, so the controller switched its needle selector off to protect it. Check the fabric where you stopped, then carry on. See Built-in safety. |
| The lights keep taking turns red and blue | A yarn or carriage change is waiting. Read the screen, make the change, and start the pass. It stops as the carriage enters the pattern area. |
| No change signals, even though the app shows changes | The controller has older firmware. The app's log says Controller has no change signals. Update the firmware. |
| The blue light never comes on | No row is loaded, or the row doesn't select any needles. |
| The row number looks wrong | Hold the button for 1 second to reset it. This doesn't change where your software is in the design. |
When TinkrkniT looks wrong
| What you see | What to try |
|---|---|
| Connect is greyed out, or says Web Serial isn't available | Use Chrome or Edge (or Firefox 151+). |
| The controller isn't in the list of ports | Try another USB cable (some only charge), close any other program using the port (such as the Arduino serial monitor), and check the USB driver is installed. |
| Start patterning is greyed out | Read the note under it: confirm the needle markers, or connect the controller. |
| Main and contrast came out the wrong way round | Turn on Swap feeders in Knitting options. |
| The pattern came out mirrored | Check Mirror left to right in Knitting options. Off knits the chart the right way round. |
| Tucks or slips land where knit stitches should be | Turn on Invert stitch selection in Knitting options. |
| Knitting stops at the end of the panel | That's on purpose. Turn on Repeat from row 1 to keep going. |
| My edits aren't being knitted | The knit screen uses a frozen copy. Press Knit again and choose Load the new design. |
| A panel is missing | Switch it back on in the View menu, or use Reset layout. |
| Long floats are flagged | Break up long runs of one color with a dot of the other, raise the limit, or catch the floats by hand as you knit. |
Controller Hardware For tinkerers
Everything you need to set up and use the controller is in TinkrkniT Controller · Usage and Help.
This part is the technical documentation: how the controller is built and wired, how its power circuit and safeguards work, how it talks to TinkrkniT, and its specifications. It's here for anyone who wants to build their own controller, repair or modify one, or dig deeper when troubleshooting.
The controller is designed for Silver Reed electronic carriages only for now, and has been tested on the SK840.
Carriage signals and wiring
The three carriage signals
- Clock: one pulse per needle as the carriage moves. The controller uses it to know which needle the selector is over.
- Point cam: tells the controller when the carriage is inside the patterning range set by the point cams.
- Direction: whether the carriage is travelling left or right.
Carriage connector (8-pin DIN)
| Pin | Name | Direction | Meaning |
|---|---|---|---|
| 1 | ND1 | carriage → controller | Needle 1 reference. Shown for diagnostics only, not used for patterning. |
| 2 | KSL | carriage → controller | Point cam. High = the carriage is inside the pattern range. |
| 3 | DOB | controller → carriage | Data out: drives the needle selector solenoid. |
| 4 | CCP | carriage → controller | Carriage clock, one pulse per needle. |
| 5 | HOK | carriage → controller | Direction. Low = moving right, high = moving left. |
| 6 | VDRIVE | power | 16.4 V solenoid power, switched by the VDRIVE circuit. Can be left disconnected for bench testing. |
| 7 | 5 V | power | Carriage logic supply, taken from USB. |
| 8 | GND | power | Ground, shared with the 16.4 V supply. |
Controller pin map (ESP32 DevKit)
| Function | GPIO | Notes |
|---|---|---|
| ND1 (DIN 1) | 25 | input, external pull-up to 3.3 V |
| KSL point cam (DIN 2) | 14 | input, external pull-up to 3.3 V |
| DOB solenoid data (DIN 3) | 26 | output; also drives the VDRIVE switch |
| CCP clock (DIN 4) | 27 | input, external pull-up to 3.3 V |
| HOK direction (DIN 5) | 13 | input, external pull-up to 3.3 V |
| OLED SDA / SCL | 22 / 21 | 3.3 V supply |
| Menu button | 33 | to GND, internal pull-up |
| BOOT button | 0 | onboard |
| Blue LED / red LED / onboard LED | 32 / 4 / 2 | The onboard LED copies the solenoid output, like the blue one, and blinks with the blue one during a change signal. Blue is dimmed (PWM) whenever red is lit with it. |
The ESP32's inputs are 3.3 V only. Pull the carriage signal lines up to 3.3 V, never to 5 V. GPIO 12 is deliberately left unused: it controls how the board boots, and a pull-up on it can stop the board starting.
The solenoid power switch (VDRIVE)
The carriage's 16 V solenoid supply (DIN pin 6, VDRIVE) isn't connected straight to the power supply. It goes through a small switching circuit, so the solenoid only gets power when the controller asks for it, and can't draw more than a safe current even if something goes wrong.
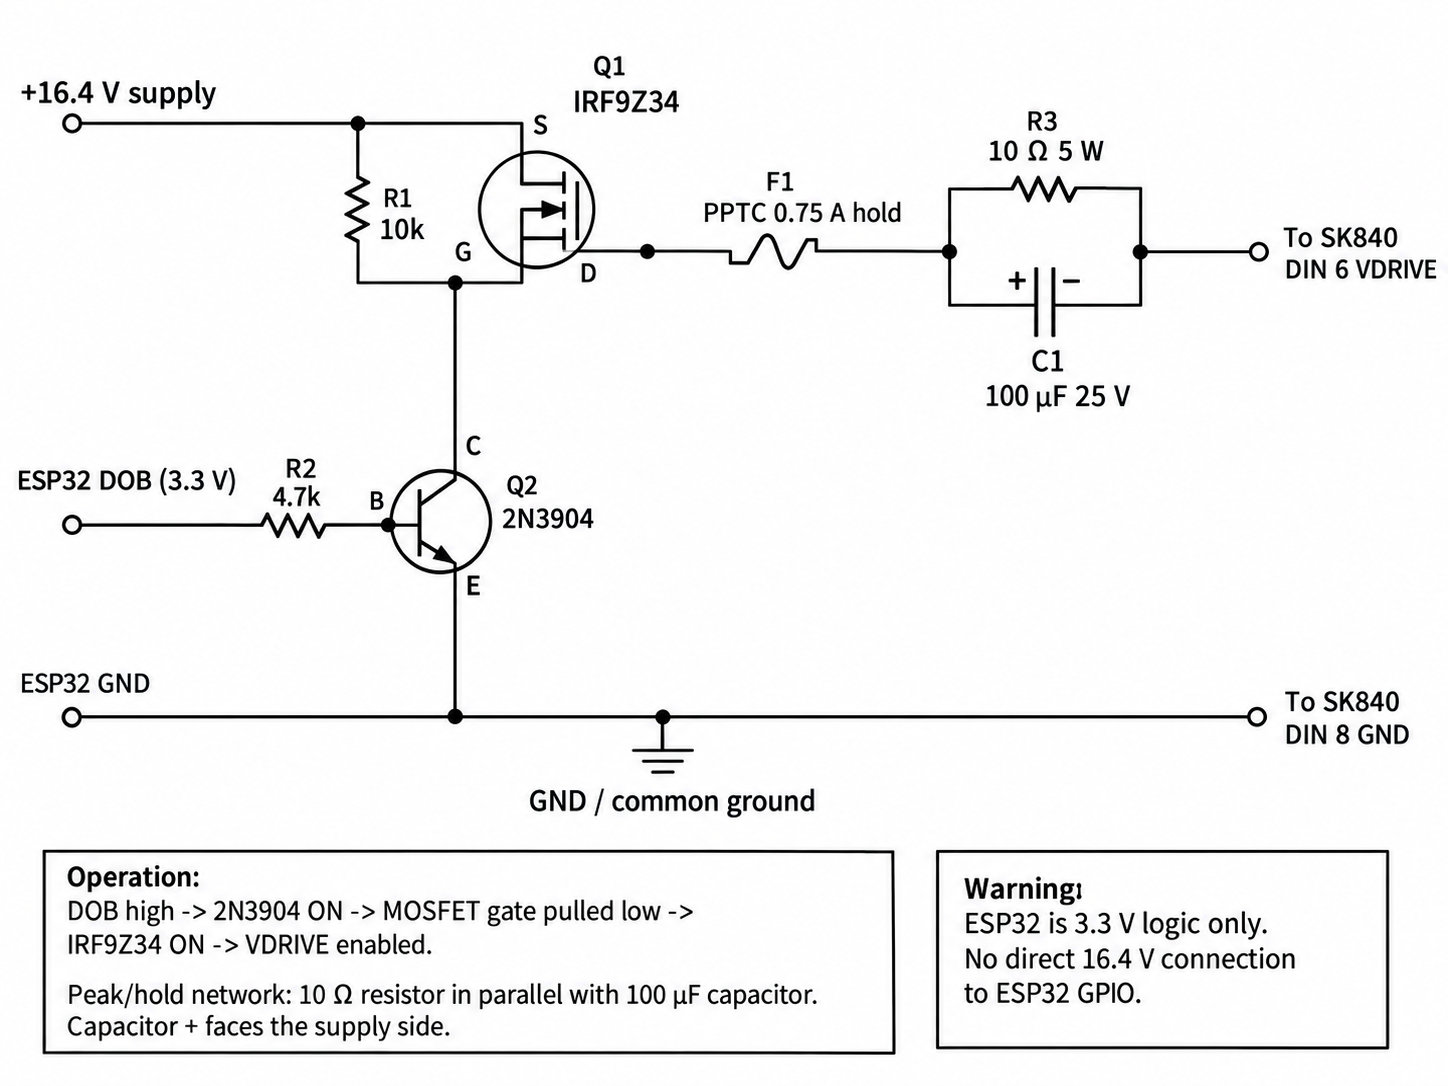
How the circuit works
- Off by default. R1 (10 kΩ) holds the gate of Q1, the IRF9Z34 P-channel MOSFET, at the supply voltage, so the switch is off whenever nothing is driving it, including while the ESP32 is starting up or unplugged.
- The ESP32 turns it on. When the DOB output (GPIO 26, 3.3 V) goes high, it drives Q2, a 2N3904 transistor, through R2 (4.7 kΩ). Q2 pulls Q1's gate down to ground, Q1 turns on, and 16.4 V flows towards the carriage. When DOB goes low, the switch turns off again.
- Fuse. F1 is a self-resetting PPTC fuse rated at 0.75 A hold. If too much current flows, for example from a short in the cable, it heats up and cuts the current. It resets by itself once it has cooled down.
- Peak and hold. R3 (10 Ω, 5 W) and C1 (100 µF, 25 V) sit side by side in the line. The moment the switch turns on, the empty capacitor lets a full burst of current through to snap the solenoid in. As it charges, the current settles to what the resistor allows: enough to hold the solenoid, but less than full power, so it runs cooler. C1's + side faces the supply.
- Common ground. The 16.4 V supply, the ESP32 and the carriage (DIN pin 8) share one ground.
How the controller protects your machine
The needle selector (the solenoid) runs from 16 V. It's designed to switch on in short bursts as the carriage sweeps past each needle. If it stays on for a long time it gets hot, which can damage it. The controller guards against that in several ways.
All of these safeguards are based on assumptions derived from other knitting machines and component teardowns by other users. These are based on best guess implementations and don't represent actual design recomendations from manufacturers.
| Safeguard | What happens |
|---|---|
| Off at start-up | The first thing the controller does is make sure the selector is off, before the screen or USB even start. It can't fire by accident while starting up. |
| 3-second cut-off | If the selector has been on continuously for 3 seconds, the controller turns it off and shows SAFETY: OUT off. Normally each needle takes a fraction of a second, so 3 seconds means the carriage has stopped. |
| Off after every row | When the carriage leaves the pattern area, the selector is switched off. |
| Nothing past the end of the row | Needles beyond the end of the loaded row are never selected, so cams set too wide can't cause extra firing. |
| Each row used once | If no new row arrives, the selector stays off. An old row is never repeated by mistake. |
| Complete rows only | A row that arrives incomplete (still missing data after 1 second), too long (over 200 needles) or garbled is thrown away and reported. |
| Ignoring electrical noise | Switching the selector creates small electrical spikes on the signal wires. The controller ignores any signal that doesn't stay steady for a moment (0.2 ms for the clock, 1 ms for the cam and direction). Without this, a spike could be counted as a needle and shift the rest of the row by one. |
| Counting checks | Each row's needle count is compared with the previous row and with the row the software sent. If either differs, the ! warning appears straight away. |
| Off when test mode ends | Switching the test pattern off also switches the selector off. |
| Switched, fused solenoid supply | The 16 V only reaches the carriage while the selector is being driven, through a self-resetting fuse and a current-limiting network. See below. |
What the cut-off looks like while you knit, and how to try the controller without solenoid power, is covered in Built-in safety.
How TinkrkniT talks to the controller
The app and the controller talk over USB serial at 115200 baud, using the byte protocol from silver-reed-write, plus two extra commands for the change signals.
- Hello. When it connects (and again when the controller announces it has restarted), the app sends
CMD_HELLO(0x10). Firmware that knows about change signals answersMSG_HELLO(0x10) followed by its version number (currently2). - Pass info. Only once a version has arrived does the app send
CMD_PASS_INFO(0x11) before each row. Older firmware would read the unfamiliar bytes as commands, so it is never sent to them. - The row follows as usual.
CMD_PASS_INFO
| Byte | Field | Meaning |
|---|---|---|
| – | 0x11 | The command. |
| – | length | How many bytes follow. Firmware skips any it doesn't understand, so fields can be added later (for example for an automatic color changer) without breaking older controllers. |
| 0 | flags | 0x01 yarn change, 0x02 cam (carriage) change, 0x04 piece done. |
| 1 | feeder 1 | Yarn for feeder 1: 0 = A, 1 = B… 0xFF = empty. |
| 2 | feeder 2 | Yarn for feeder 2, the same way. |
| 3 | next | Reserved for the next change (not used by firmware v2). |
| 4 | cam | 0 plain, 1 Fair Isle, 2 tuck, 3 slip, 4 jacquard. |
If both the yarn and cam flags are set, the screen alternates between them. Done outranks a yarn change, which outranks a cam change. The signal is cleared when the carriage enters the cams, or by CMD_CLEAR_ROW.
Specifications
| Item | Value |
|---|---|
| Firmware version | 2 (reported to the app on connect) |
| Maximum row width | 200 needles |
| USB serial speed | 115200 baud |
| Display | SSD1306 OLED, 128 × 64, I²C address 0x3C, refreshed 10 times per second |
| Solenoid supply | 16.4 V, switched by an IRF9Z34 MOSFET, 0.75 A self-resetting fuse, 10 Ω / 100 µF peak-and-hold |
| Solenoid safety cut-off | 3 s of continuous on-time |
| Noise filter | clock 0.2 ms; point cam and direction 1 ms |
| Incomplete-row timeout | 1 s |
| Change signal | red and blue alternate every 0.5 s; yarn and cam text alternate every 1 s |
Data dot / LINK / ACTIVE windows | 1.5 s / 15 s / 3 s |
| Button tap / hold / gap between taps | < 0.4 s / 1 s / < 0.5 s |